Web Scraping
This lesson will teach you how to extract data from websites using web scraping.
This lesson uses code that accesses live data from a website. Because the website might change, the example results displayed in this lesson and your results from running your code might be slightly different because of changes in the web page.
What is Web Scraping?
In machine learning, there will be times when you cannot find a dataset with the data that you need. In this case, you will need to create your own datasets from information you find online.
However, having to manually research and type out all the data into a csv file would be time consuming and prone to mistakes. Especially if you want to create a dataset with thousands of entries.
For example, wikipedia has a great dataset about cats. However it's not in a csv format, so we can't just insert this webpage into our program directly if we want a dataset about cats.
The easiest way to get this data efficiently is through API's (application programming interfaces). Large websites like Google, Facebook, and Twitter provide APIs to access their data in a more structured way.
Unfortunately, not all websites have an API. This is where web scraping comes in.
Web Scraping is a computer software technique that allows us to extract information from websites. It mostly involves transforming unstructured data from the web into structured data in the form of databases or spreadsheets.
As one of the leading languages for data science, Python has many libraries and frameworks for web scraping. We will be using two popular modules:
Requests - a HTTP library that allows your program to access a website and its data. It is very easy to use while having a lot of capabilities.
BeautifulSoup 4 - a parsing library that can use different parsers. A parser is just a program that can extract data from HTML and XML documents (webpages). It basically allows us to get the specific parts of a webpage that we want, such as table data or links.
Understanding Websites
When performing web scraping, we need to know what we want to extract from a page. This means that we need to know how websites are written.
Websites are written in HTML (Hypertext Markup Language) which is what describes the structure of a webpage. Even this page is written in HTML!
Tags are what HTML uses to describe and structure components of pages. All tags have a tag name surrounded by a less-than symbol and a greater-than symbols in the form <tag-name>.
Many times an opening tag <tag-name> will be paired with a closing tag </tag-name>. (The difference is the closing tag includes a forward slash). These tags will usually have text or more tags in between then e.g. <title>My Webpage</title>.
Here is what a basic html document looks like:
<!DOCTYPE html>
<html lang="en">
  <head>
    <meta charset="utf-8">
    <title>My Webpage</title>
  </head>
  <body>

    <h1>Hello</h1>

    <p>This is a webpage written in HTML</p>

    <a href="http://google.com">A link to Google</a>

  </body>
</html>
We can actually write this code in a text file and save it as a .html file. Then we can open the document as a webpage. This is how this document would be displayed:
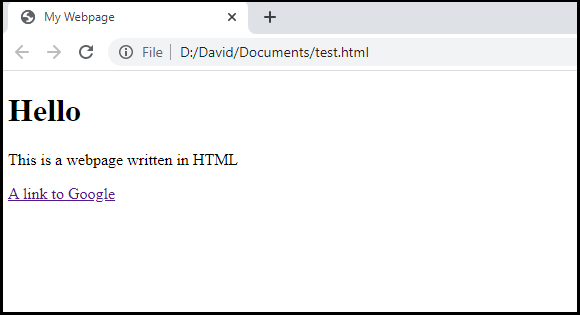
As you can see, we have a simple webpage that only has the text we wrote, and the tags structured the text accordingly.
There are various parts of this code that are all important to displaying the text on the web page.
1. The <!DOCTYPE html> tag tells specifies that this is a HTML document.
2. The <body> tags contain the visible part of the HTML document
3. The <title> tags added the text My Webpage to the webpage tab.
4. The <h1> tags created a header with the text Hello.
5. The <p> tags created a paragraph with the text This is a webpage written in HTML.
6. The <a> tags created a link to google.com with the text A link to Google. The href attribute in the <a> tag contains the url that the link should take you to.
You can learn more about HTML here.
Now that you understand HTML, we can use tags to specify what we want BeautifulSoup to extract from a website.
Downloading Webpages
Let's use Requests and BeautifulSoup to scrape data from a website. We will be using this Wikipedia page about cat breeds.
Our final goal is to extract the list of cat breeds as well as details about each breed such as country, origin, pattern, etc.
First create a new project in Spyder and save it as WebScraping.
Then, create a new file inside the project and save it as cats.py. You can also delete the text that's already in the file.
First, let's import our modules:
Requests
BeautifulSoup 4
Pandas
import requests
from bs4 import BeautifulSoup
import pandas as pd
Now, let's specify the url that we want requests to open. The URL is just the address of the webpage.
We can use the requests.get() function. This function takes in a URL as an argument, downloads the page, and returns a Response object.
The Response object stores all the information about the webpage. We will call the object page.
import requests
from bs4 import BeautifulSoup
import pandas as pd

cats_wiki = 'https://en.wikipedia.org/wiki/List_of_cat_breeds'
page = requests.get(cats_wiki)
We can check if the page downloaded successfully by printing the status_code attribute of the Response object.
cats_wiki = 'https://en.wikipedia.org/wiki/List_of_cat_breeds'
page = requests.get(cats_wiki)

print(page.status_code)
If it returns a code that begins with 2 (e.g. 200) then the download was a success. Codes that begin with a 4 or 5 indicate that an error occurred.
You can also just use print(page) which will show the status code.

Success! We now have all the contents of the wiki page stored in this object. Let's print the actual HTML text of the page.
Before we print, we need to change the preferences for the IPython console in Spyder.
By default, the console will only print a maximum of 500 lines. However most webpages are thousands of lines. This wikipedia page is over 8000 lines, so we will change the settings to print a maximum of 10000 lines.
To do this, click on Tools then Preferences. Then in the preferences window, go to the IPython console settings and under Source code increase the Buffer value to 10000 (ten thousand).
Now restart Spyder so the changes take affect.
When you close and reopen Spyder it should open your up your most recent project. If it does not reopen the project then go to Project -> Recent Projects and select your project to open it.
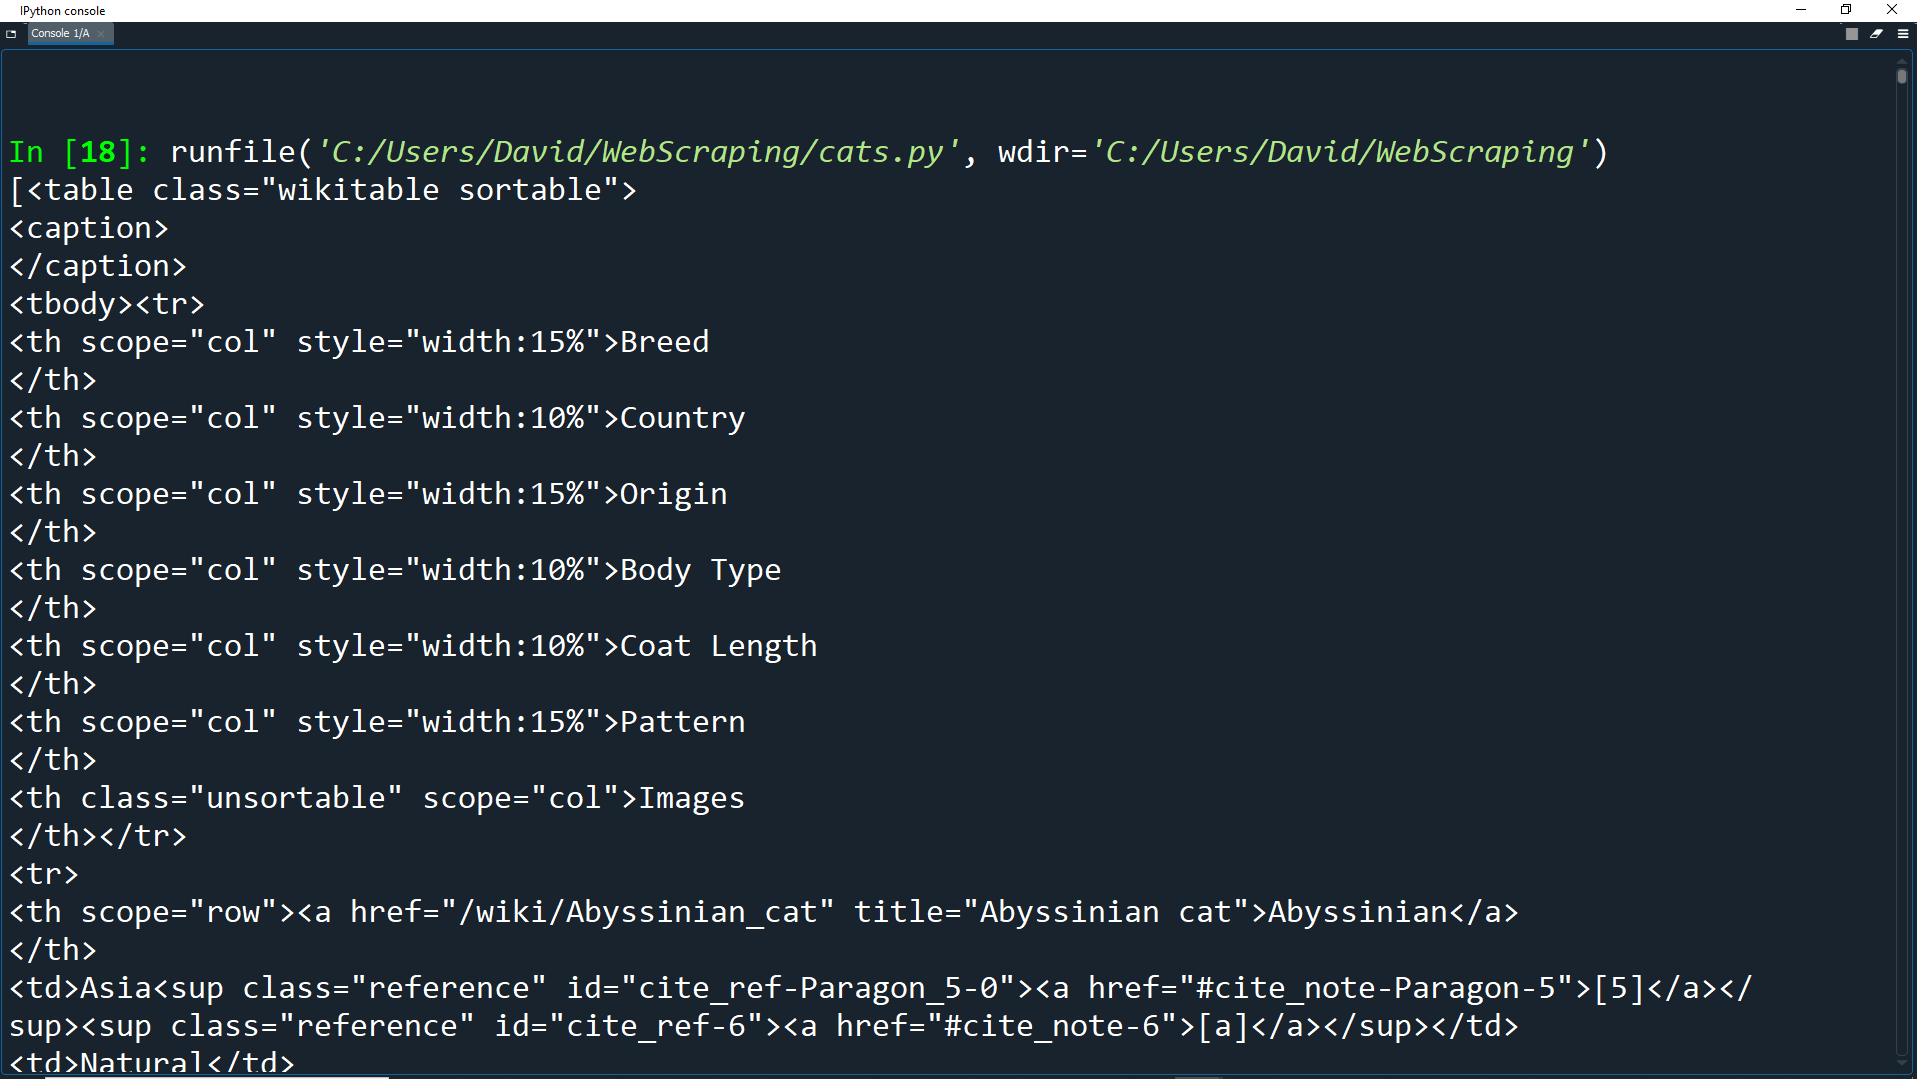
Now we can print the HTML to the console using the text attribute of the Response object.
cats_wiki = 'https://en.wikipedia.org/wiki/List_of_cat_breeds'
page = requests.get(cats_wiki)

print(page.text)

Here you can see the full text of the page, with all of its HTML tags. However, it is hard to read because there is no spacing like we saw with our example HTML document.
This is where BeautifulSoup comes in to make the text more human-friendly.
First, let's clear the console of all this text. Remember that you can do this by right-clicking in the IPython console pane and selecting Clear console. Alternatively you can just left click in the console pane and press CTRL + L on your keyboard.
Now, let's use BeautifulSoup to parse the html and store it in BeautifulSoup format.
cats_wiki = 'https://en.wikipedia.org/wiki/List_of_cat_breeds'
page = requests.get(cats_wiki)

soup = BeautifulSoup(page.text, 'html.parser')
This creates a BeautifulSoup object (which we call soup) from the page text using the Python's built-in html.parser.
Now we have all the HTML contents of the wiki page in a nice, readable format. Let's take a look at the newly formatted HTML of the page using soup.prettify().
soup = BeautifulSoup(page.text, 'html.parser')

print(soup.prettify())
As you can see, the new format is much easier to read. There is only one tag per line and the tags are nested nicely.
Clear your console again and we will start getting some specific data from this text.
Finding Tags
We can extract a single type of tag from a page by using BeautifulSoup's find() function. This will return the first element of a certain tag within the page.
Let's get the first <a> tag from the page and store it in a variable called link. We can then print it to the screen.
soup = BeautifulSoup(page.text, 'html.parser')

link = soup.find('a')
print(link)

We can also use the find_all() function. This will return a list of all elements with a certain tag within the page.
Let's get all the <a> tags from the page and store them in a list called links.
We can then print the length of the list with the len() function.
soup = BeautifulSoup(page.text, 'html.parser')

links = soup.find_all('a')
print(len(links))

You might get a slightly different number than the one displayed here. This is because there may have been updates to the page that will change the number of links, but it should be around 838 links on the page.
Print index 34 from the links list which will be the 35th link on the page.
soup = BeautifulSoup(page.text, 'html.parser')

links = soup.find_all('a')
print(links[33])

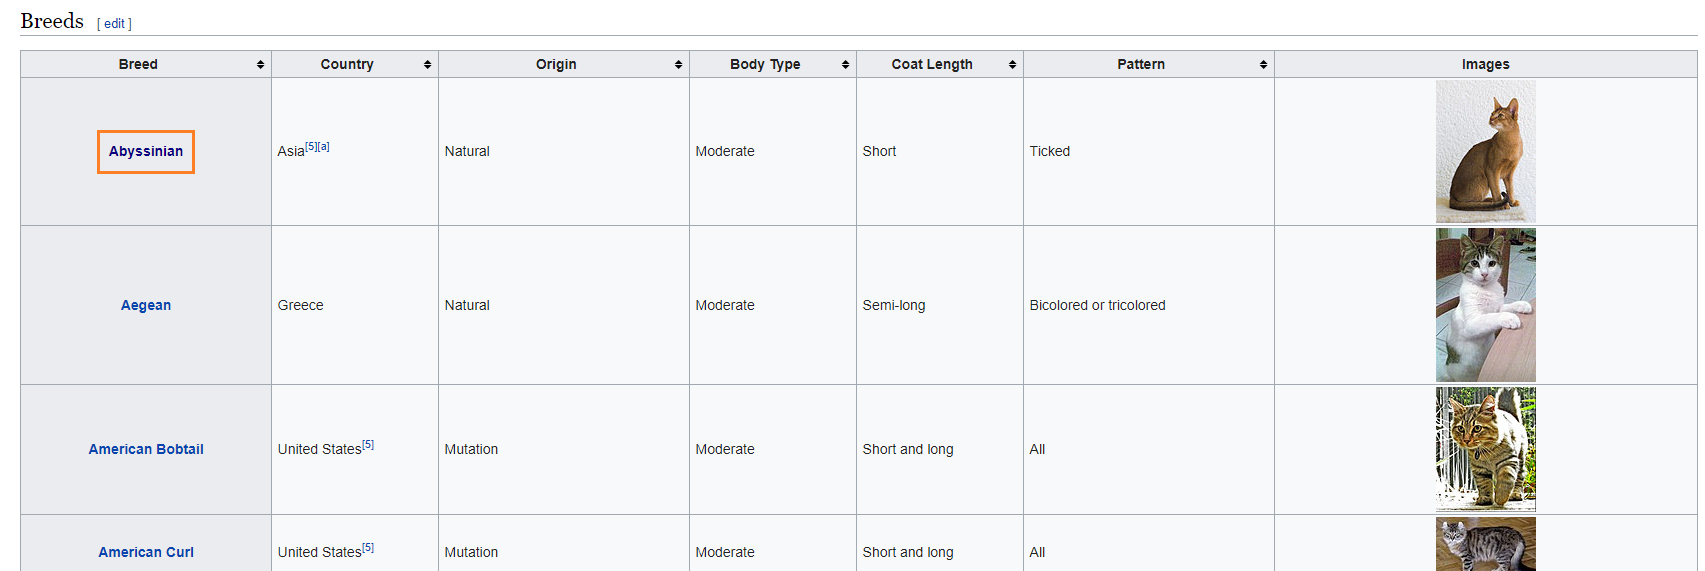
This is an example of a result that you might get back. If the page has changed, your exact result may be slightly different, but it will still be a link. In this example, this link has the text Abyssinian and the href attribute specifies that the link redirects to another wiki page with the url
/wiki/Abyssinian_cat.
This link example is the first link in the table of cat breeds.
Another thing we can do is get the specific link inside the <a> tag. We can do this using the get() function which gets the contents of a specific attribute within a tag.
soup = BeautifulSoup(page.text, 'html.parser')

links = soup.find_all('a')
print(links[33].get('href'))

As you can see, we now get only the contents inside the href (the URL of the link) if that is the data we want for our dataset.
Classes and IDs
Another way we can extract tags is using classes and IDs.
Classes and IDs are used in HTML to modify tags such as by changing the look of the contents of tags using CSS (cascading style sheets.)
Classes are used to identify a group of tags while IDs are used to identify one specific instance of a tag.
<!DOCTYPE html>
<html lang="en">
  <head>
    <meta charset="utf-8">
    <title>My Webpage</title>
  </head>
  <body>

    <h1 class="big-title" id="main-title">Hello</h1>

    <p class="information">This is a webpage written in HTML</p>
    <p class="information">Our paragraphs have classes</p>

    <h1 class="big-title" id="second-title">Links</h1>

    <a href="http://google.com" class="extra-info">A link to Google</a>
    <a href="http://youtube.com" class="extra-info">A link to YouTube</a>

  </body>
</html>
As you can see in this example, the <h1>, <p> and <a> tags all have classes. The <h1> tags also have ID's.
Multiple tags can have the same class e.g. the <p> tags in this example are both grouped with the
informationclass.
However, an ID can only be assigned to a specific tag. The <h> tags in this example both have the
big-titleclass but have separate IDs of
main-titleand
second-title.
To locate all tags with a certain class, we can use the keyword argument class_ in the find_all() function. To locate all a tag with a certain id, we can use the keyword argument id in the find_all() function.
info = soup.find_all(class_='information')
main_title = soup.find_all(id='main-title')
Here we get all the elements with the class 'information' and the element with the id 'main-title'.
We can also search for a class or id only within certain tags.
info = soup.find_all('p', class_='information')
main_title = soup.find_all('h1', id='main-title')
Now that you understand IDs and classes, we can use them to extract specific tags from the webpage.
Most of the time when we scrape websites for data to be used in machine learning, we look for tables of data. Let's find the table about cat breeds. This table has the class
wikitable.
soup = BeautifulSoup(page.text, 'html.parser')

cat_table = soup.find('table', class_='wikitable')
print(cat_table)
How did we know that the table had this class?
We can find out the tags, classes, id's and other information of elements by inspecting a webpage.
This can be done by pressing F12 which will bring up the developer window. Depending on the web browser that you use, this developer window will look slightly different. In the below video example, Google Chrome is used, so you will need to use Google Chrome if you want to follow along with the video.
If pressing F12 does not bring up the developer window, try holding down the FN key when pressing F12
Then, in the elements tab click the inspect button which allows you to hover over elements and click them so they display in the inspector.
Some browsers also allow inspecting an element directly by right-clicking on a webpage and selecting Inspect (Google Chrome) or Inspect element (other browsers).
Great! Now you know how to find out the information of webpage elements.
The next step is to actually get the data from the table so we can use it.
Extracting from tables
We have our table of data, and now we need to extract the data from it so we can create our own DataFrame.
To do this, we need to go through each table row (<tr> tags) and then create a list of the table data (<td> tags) from each table row.
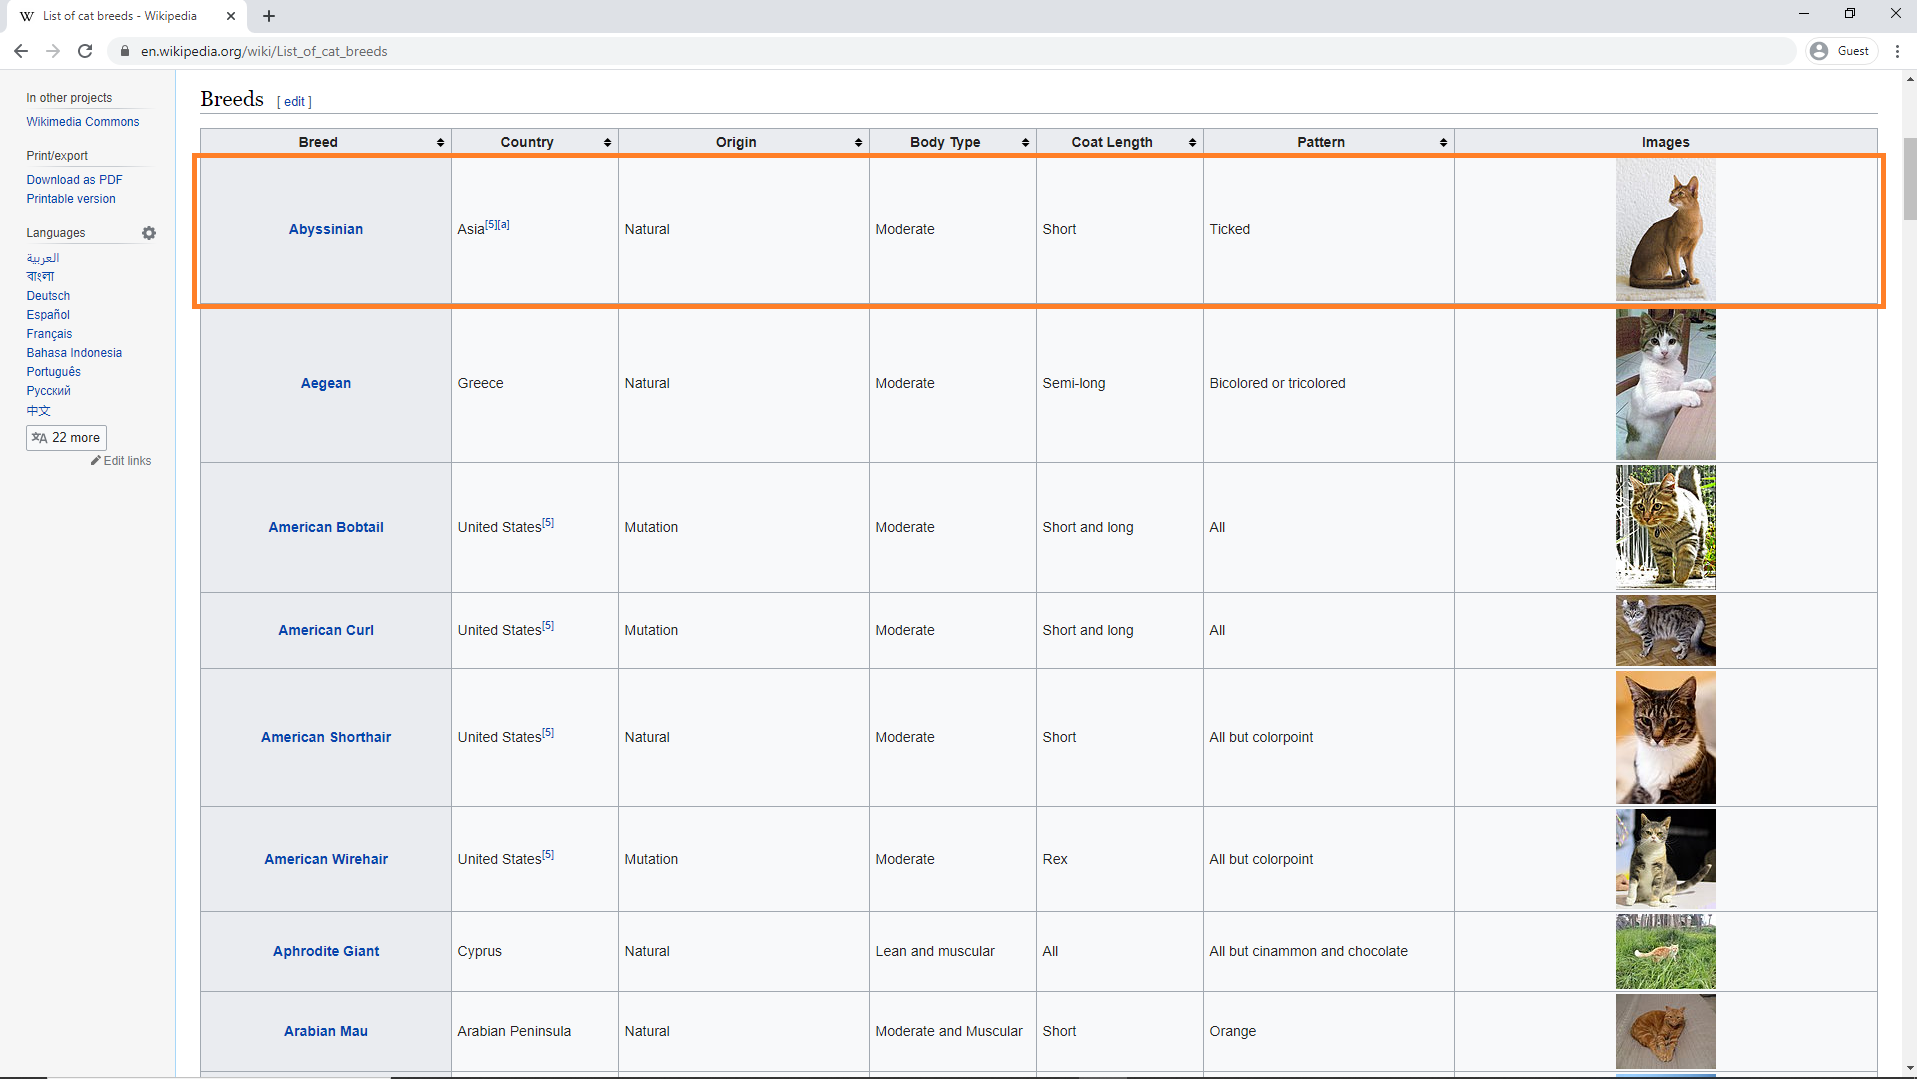
As you can see in the HTML code, the first table row contains 7 table headers (<th> tags).
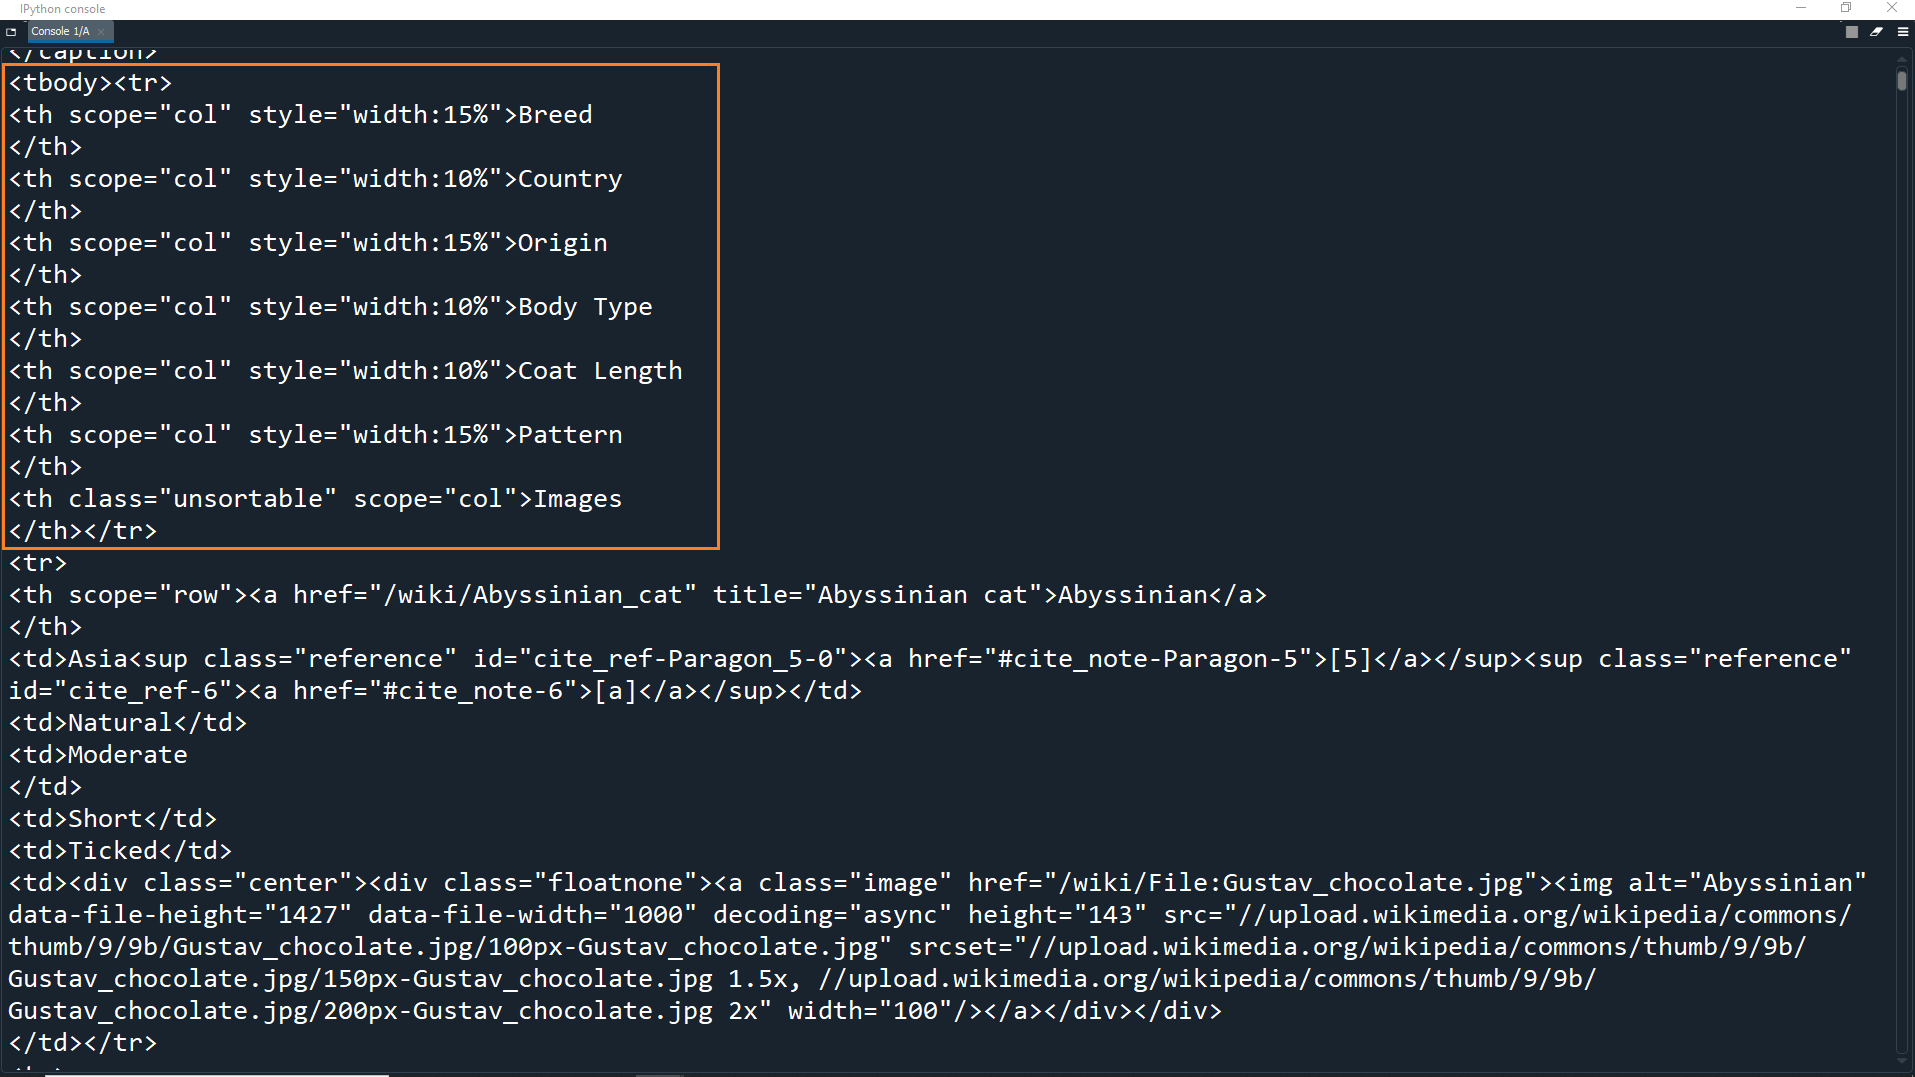
This is the top row of the table which shows the headers of each column.
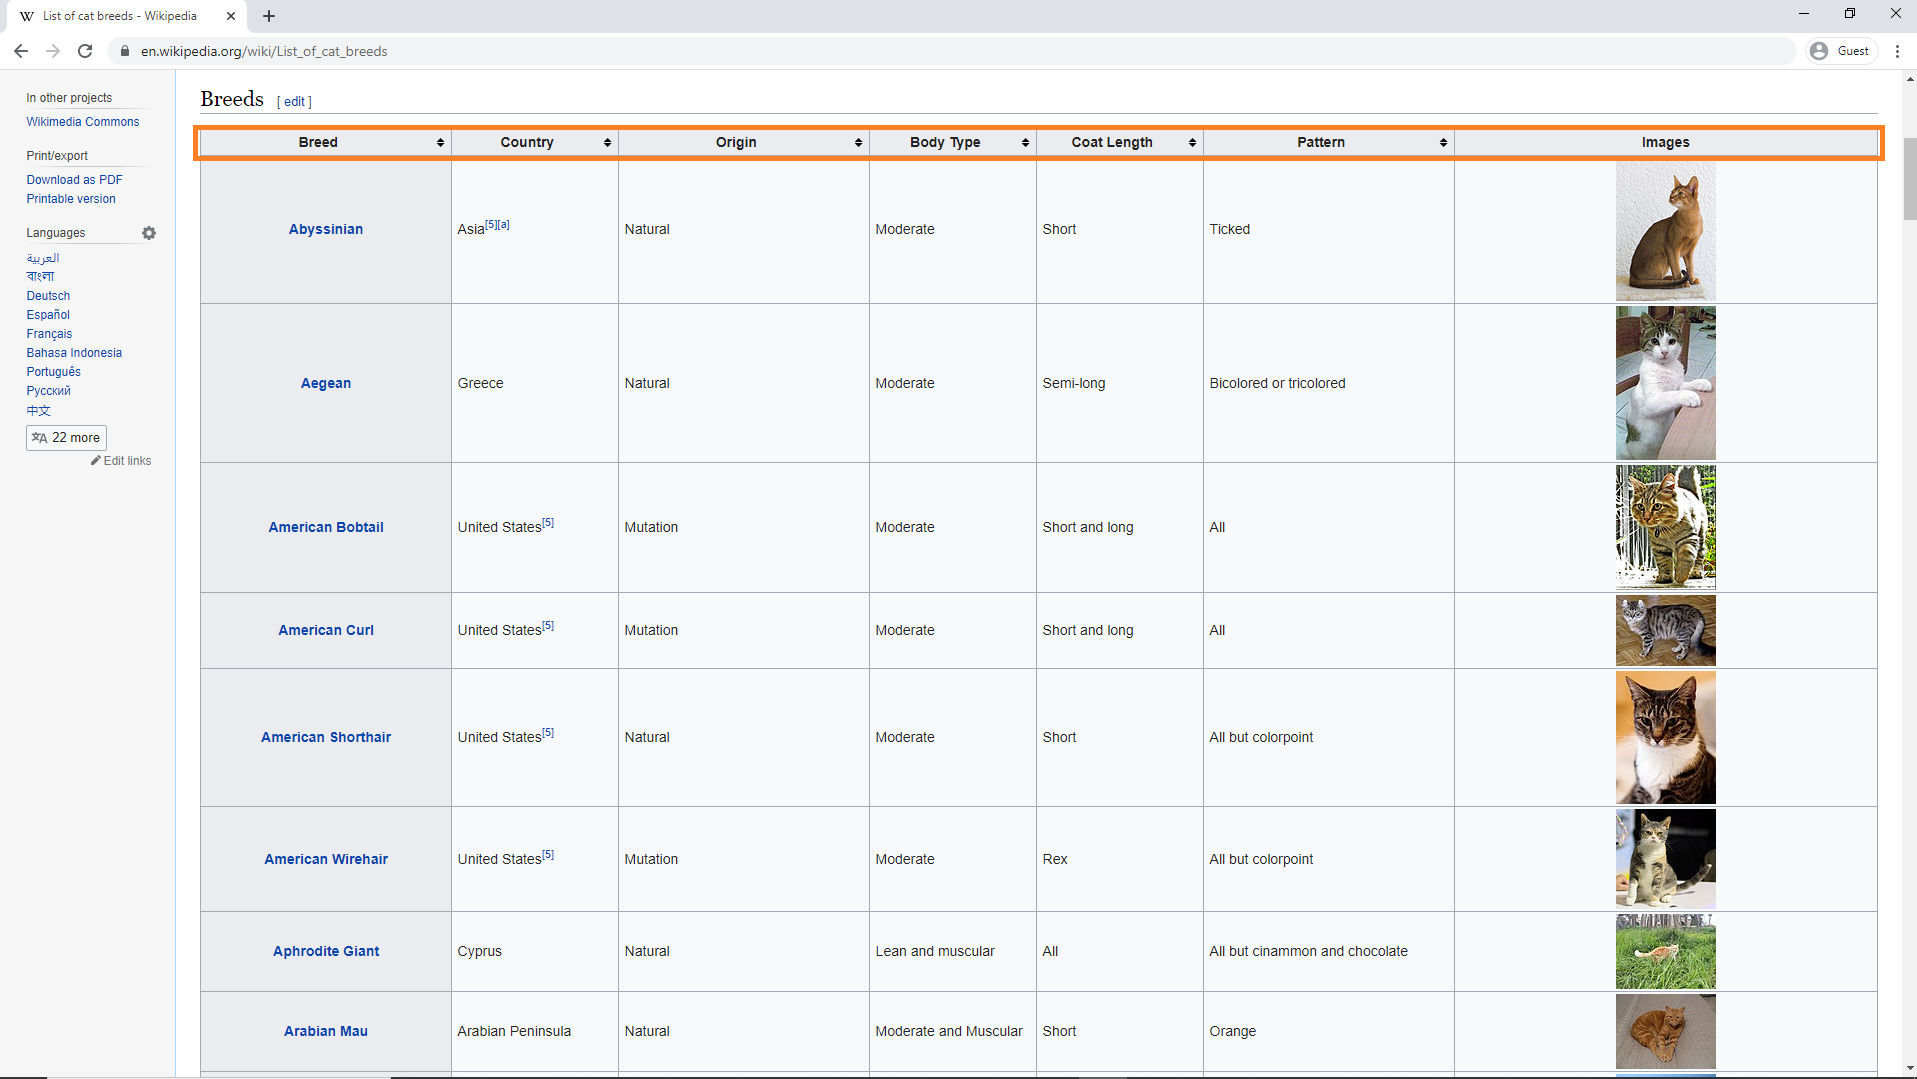
The second table row contains 1 table header (<th>) and 6 table data elements (<td> tags).
This is the second row in the table, which is actually the first row with data of cat breeds. In this example, this data is for the Abyssinian breed.
The <th> tag is the header/identifier of the row (the breed name). Each <td> tag contains data for one of the other columns of the table.
Now let's create the loop that will go through each table row and extract the data.
First let's declare 7 lists to hold the data for each of the 7 columns.
soup = BeautifulSoup(page.text, 'html.parser')

cat_table = soup.find('table', class_='wikitable')

breed = []
country = []
origin = []
body_type = []
coat_length = []
pattern = []
images = []
Next we must create a for loop that goes through each row in cat_table.
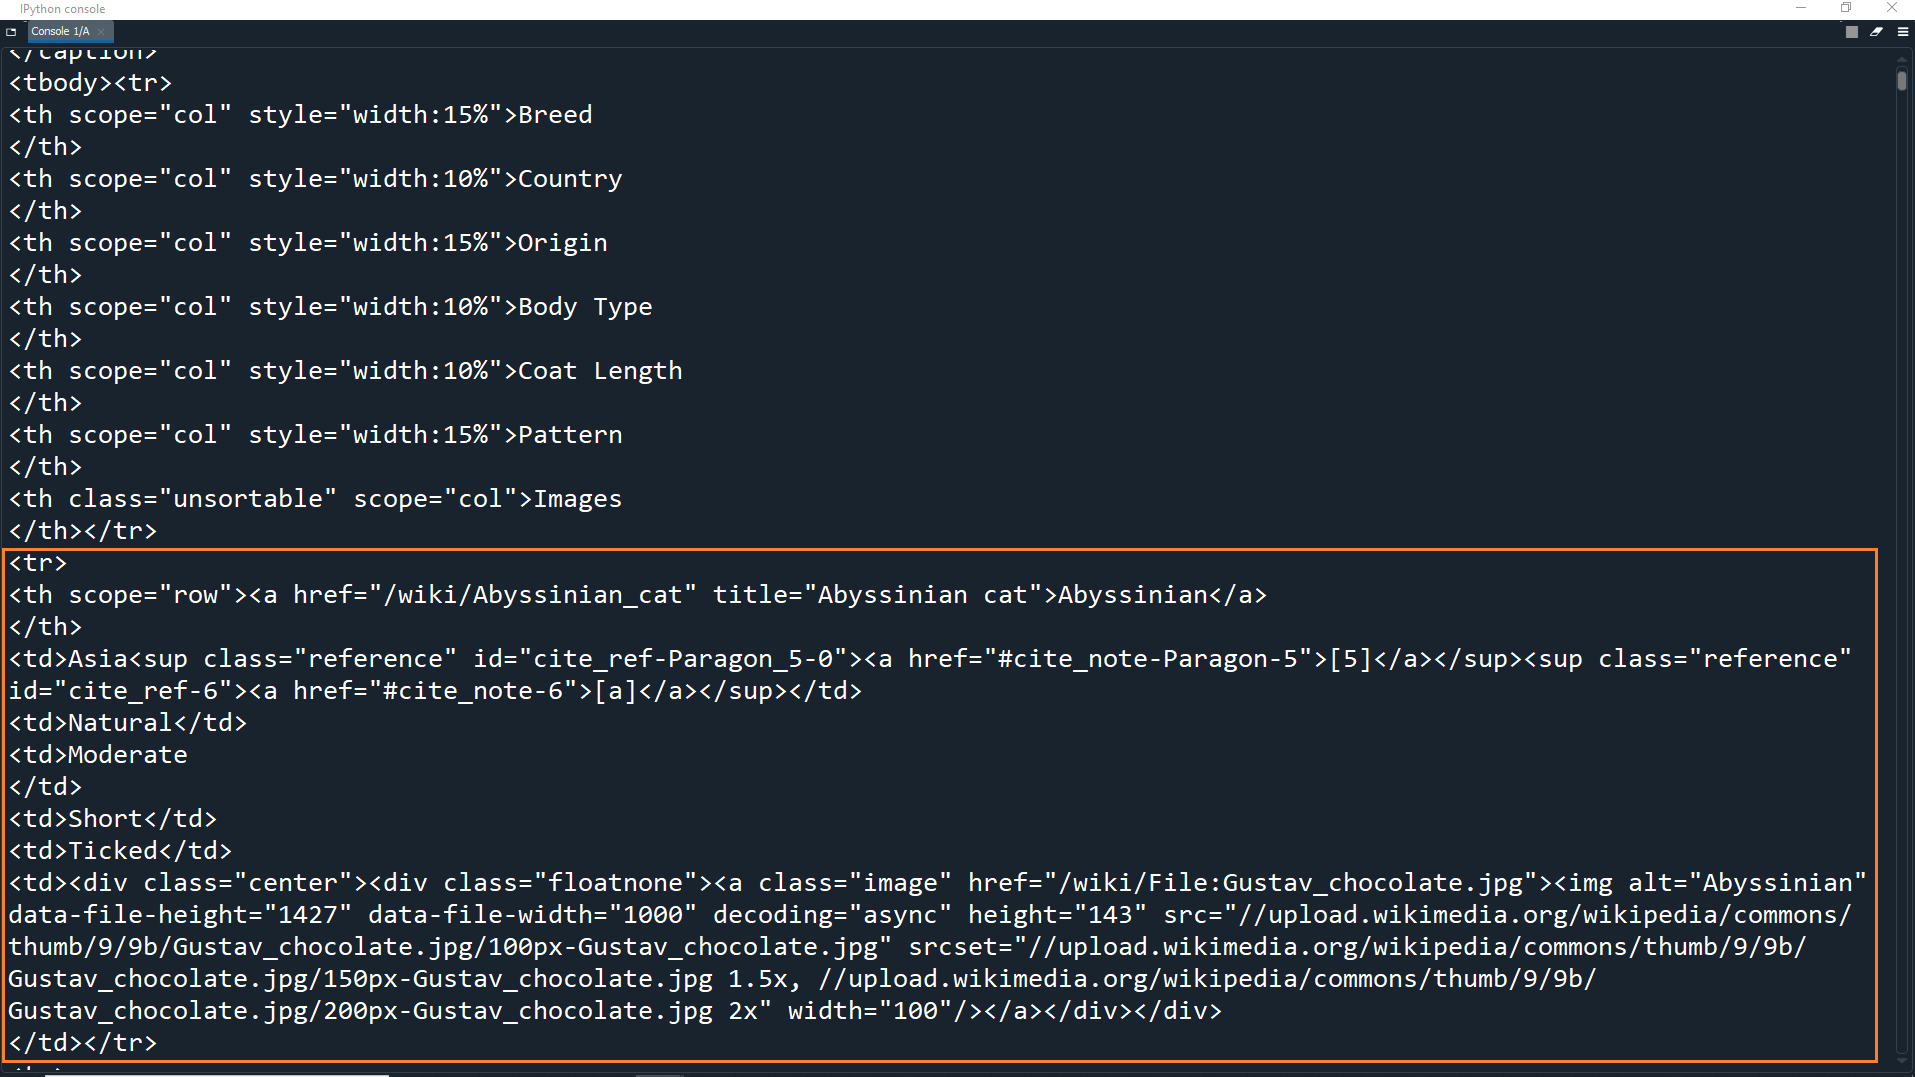
However, if you look at the HTML code you will actually see that the contents of the table are wrapped in <tbody></tbody> tags.
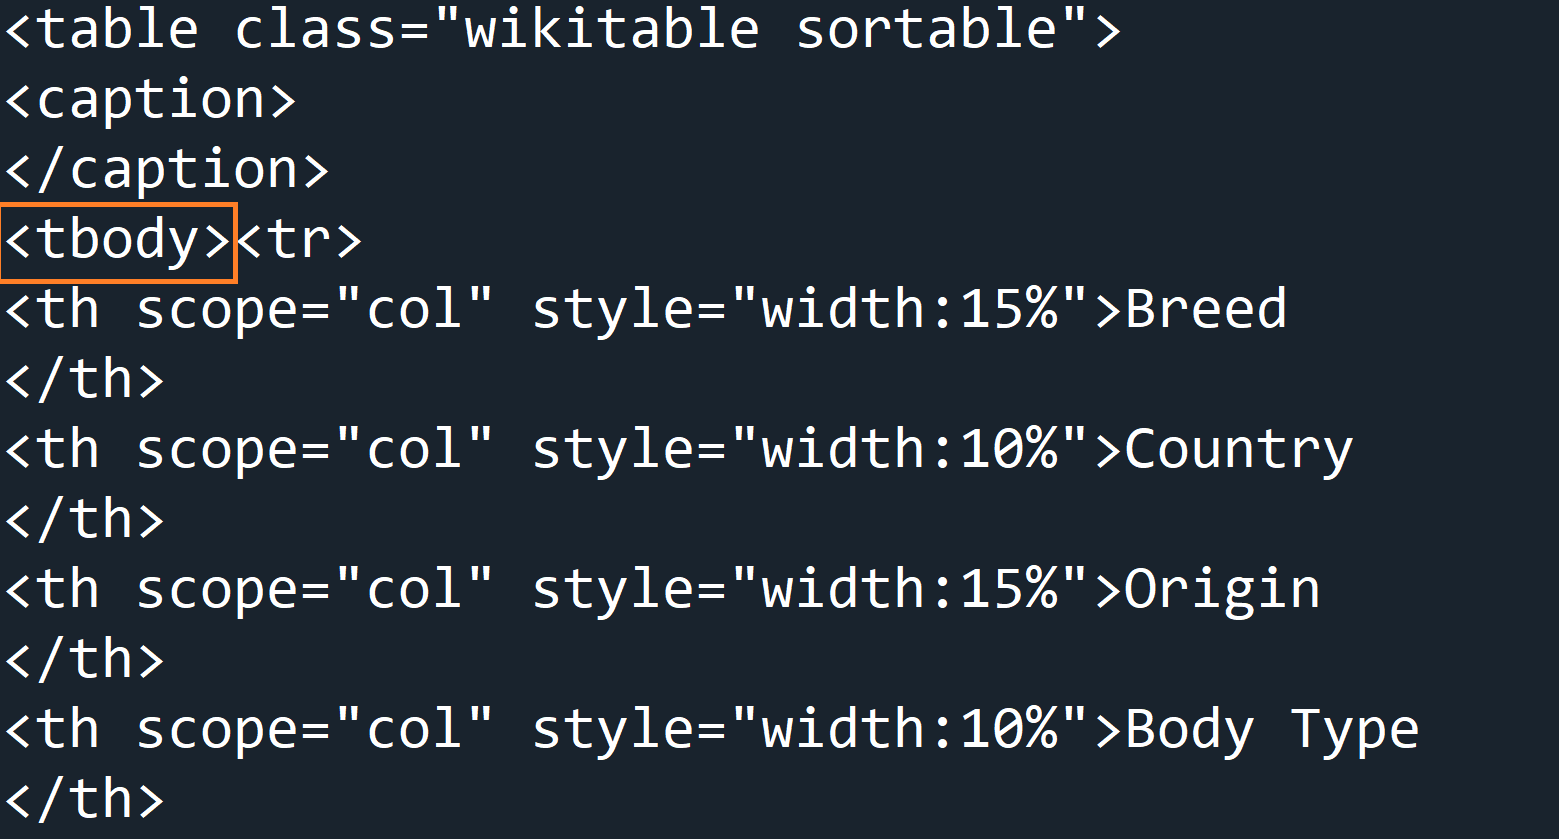
Therefore we first have to get this tag element using cat_table.find('tbody').
We can then find all the table rows to loop through by adding .find_all('tr').
The first thing we will do in the loop is store a list of all the <td> elements of the current row in a variable called breed_info.
breed = []
country = []
origin = []
body_type = []
coat_length = []
pattern = []
images = []

for row in cat_table.find('tbody').find_all('tr'):
    breed_info = row.find_all('td')
However, this will only get 6 elements because there are 6 <td> tags (breed information) and 1 <th> tag (breed name) for each row.
Therefore we also need to find the <th> tag from the row and store it in another variable called breed_name
for row in cat_table.find('tbody').find_all('tr'):
    breed_info = row.find_all('td')
    breed_name = row.find('th')
The next step is to append the breed_name to the breed list and to append each element from breed_info to their respective lists.
However, if you recall, the very first row of the table contains the column headers and we do not want to append these.
We can avoid appending these by only appending to the lists if the length of breed_info is equal to 6. Since breed_info only finds <td> tags, we will know that we can append the data if there are 6 table data elements inside it.
for row in cat_table.find('tbody').find_all('tr'):
    breed_info = row.find_all('td')
    breed_name = row.find('th')

    if len(breed_info) == 6:
        breed.append(breed_name.find(text = True))
        country.append(breed_info[0].find(text = True))
        origin.append(breed_info[1].find(text = True))
        body_type.append(breed_info[2].find(text = True))
        coat_length.append(breed_info[3].find(text = True))
        pattern.append(breed_info[4].find(text = True))
Unfortunately not all records have an image for the cat breed. Therefore we need to first check if the current row has actually has an image by looking for the <img> tag.
If the row does have an image, then we can extract the source attribute from the image. The source attribute (src) holds the actual URL to the image.
If the row does not have an image, then we can just append the string
No Imageto the image list.
for row in cat_table.find('tbody').find_all('tr'):
    breed_info = row.find_all('td')
    breed_name = row.find('th')

    if len(breed_info) == 6:
        breed.append(breed_name.find(text = True))
        country.append(breed_info[0].find(text = True))
        origin.append(breed_info[1].find(text = True))
        body_type.append(breed_info[2].find(text = True))
        coat_length.append(breed_info[3].find(text = True))
        pattern.append(breed_info[4].find(text = True))

        if breed_info[5].find('img'):
            images.append(breed_info[5].find('img').get('src'))
        else:
            images.append('No Image')
Now our loop is complete! Notice that we use the breed_name to append to the breed list.
Then, we use the 6 elements in breed_info to append to each of their respective lists. For example, breed_info[0] is the first table data element in the row which is in the country column, so gets appended to the country list.
We also use the list method find(text = True) which appends only the text from the element, while ignoring the tags.
Now that we have extracted all the data, let's print a sample column to make sure everything is correct.
for row in cat_table.find('tbody').find_all('tr'):
    breed_info = row.find_all('td')
    breed_name = row.find('th')

    if len(breed_info) == 6:
        breed.append(breed_name.find(text = True))
        country.append(breed_info[0].find(text = True))
        origin.append(breed_info[1].find(text = True))
        body_type.append(breed_info[2].find(text = True))
        coat_length.append(breed_info[3].find(text = True))
        pattern.append(breed_info[4].find(text = True))

        if(breed_info[5].find('img' )):
            images.append(breed_info[5].find('img' ).get('src'))
        else:
            images.append('No Image')

print(breed)
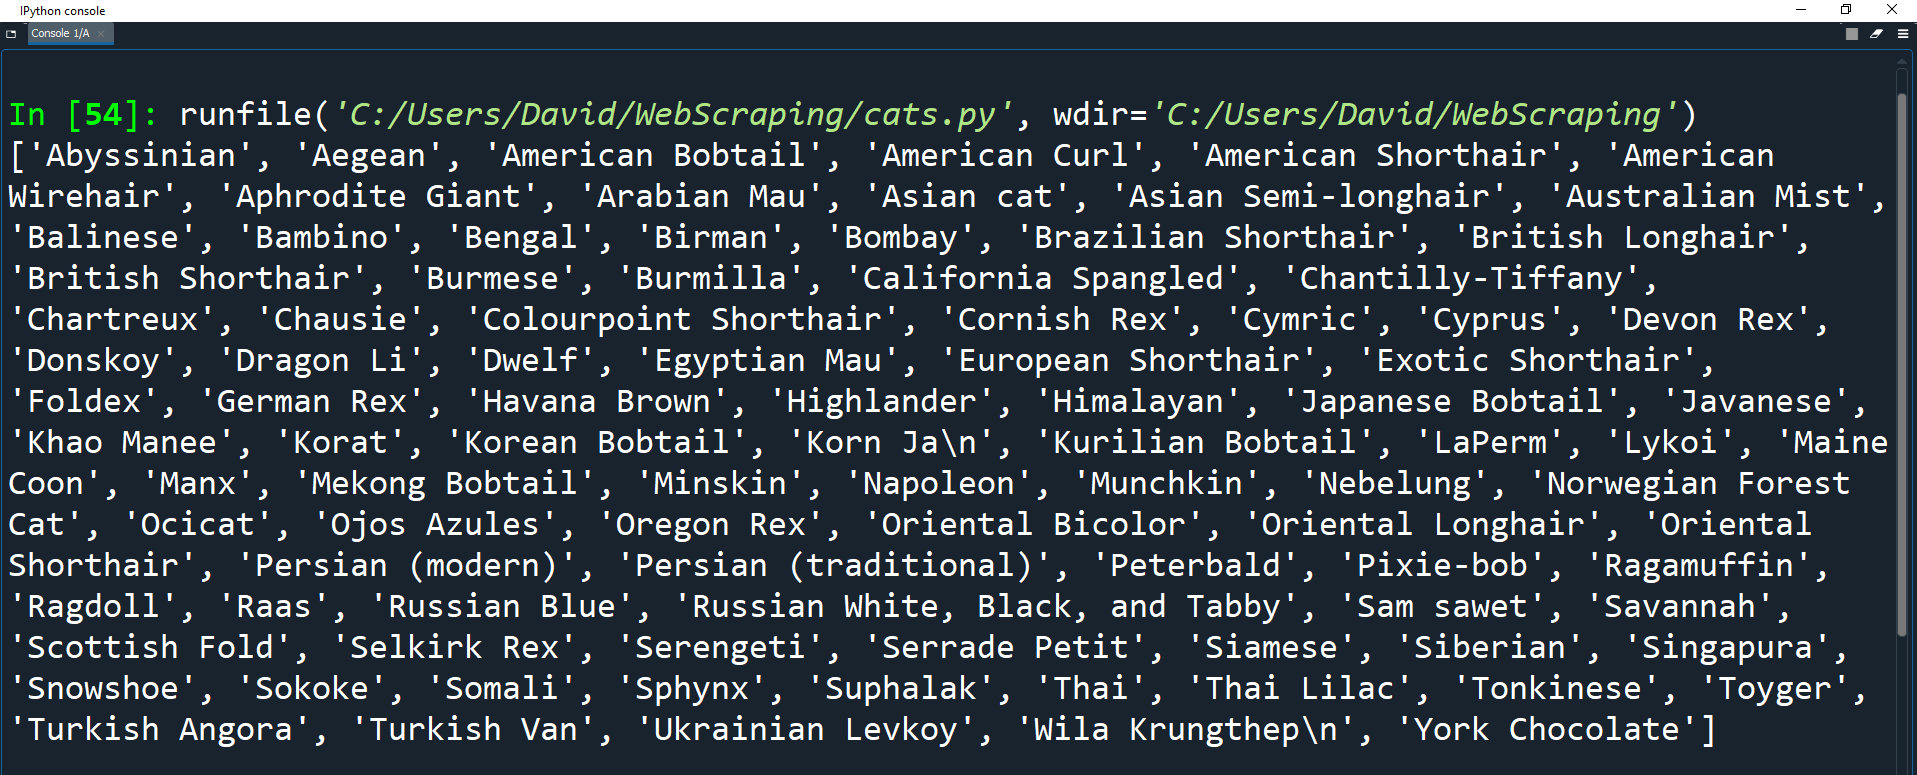
As you can see, the breed list has all the names of the breeds from the first column of the table.
Let's print the length of the list to see how many records we have.
print(len(breed))

In this screenshot, there were 96 records. That's 96 different cat breeds! You might have a slightly different number, considering the website may have changed, but it will be around 96.
The last thing we need to do is use the extracted data to create a DataFrame.
We can do this by creating a DataFrame object and passing in the data for each column as well as the title we want to give each column.
We will provide this data in the form of a dictionary, where the column title is the key, and the list of data for that column is the value.
cat_breed_df = pd.DataFrame(
    {'Breed': breed,
     'Country': country,
     'Origin': origin,
     'Body Type': body_type,
     'Coat Length': coat_length,
     'Pattern': pattern,
     'Images': images
    })
Let's print the DataFrame to see what it looks like. We will also set the display.max_columns option to None so that we can see all of our columns.
cat_breed_df = pd.DataFrame(
  {'Breed': breed,
   'Country': country,
   'Origin': origin,
   'Body Type': body_type,
   'Coat Length': coat_length,
   'Pattern': pattern,
   'Images': images
  })

pd.set_option('display.max_columns', None)
print(cat_breed_df.head())
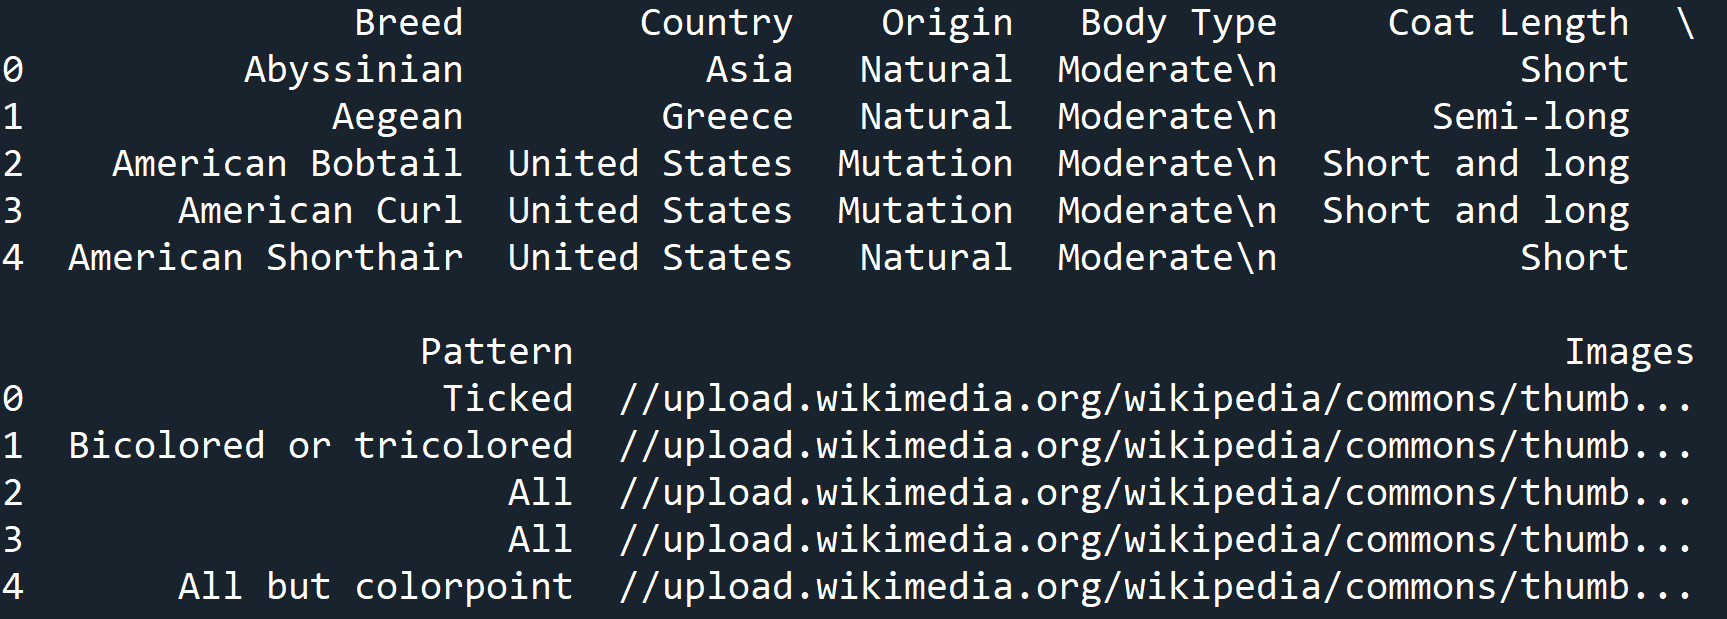
Fantastic! We now have our completed custom DataFrame made from data that we scraped from the Internet.
However, extracting data is just the first step. The DataFrame still needs to be cleaned before we can use it.
For example, the data in the Body Type column has a \n at the end (which creates a new line in HTML). This should to be removed from the data.
Also, since we know that the Breed column has unique names for each row, we could use this as our index column instead of the default indexing.
Take another look at the dataset cleaning guide to see how you can clean our new dataset.
1. Try and remove the \n from the data in the Body Type column.
2. Make the Breed column the index of the dataset.
Activity: Challenges
- Get a few random pages using wikipedia's random page feature and save them into different variables
- Get the paragraph content from those articles, and pick specific words that appear in multiple articles
- Start with one article, then when you get to a word that is the same in another article, switch the content to display from the other article.
- Now, you have a weird mashup of articles which might seem like they have nothing to do with each other...or do they?
Now that you know how to get data from websites, there is a lot that you could do.
Run analysis on the Dataset
The cat dataset that you have put together has all the information you need to analyze the dataset. Try to run some functions to group cats by different types and characteristics.
Dog Breed Challenge
Wikipedia had a great table layout for all dog breeds. However, sometimes you may need to do additional cleanup on some web data to turn it into a usable data frame.
The Encyclopedia Britannica Dog Breed List lists dogs, but puts them in separate tables by type.
Can you put all the different tables into one usable dataset that is easy to use?
Go Random!
Wikipedia has a fun tool that allows you to select a random page: Wikipedia Random Article.
You could create your own fake article by mashing up different articles and seeing what will result: