Setup a Third Person Controller
In this tutorial, you will create a platformer using the Third Person Controller from Unity's Standard Assets.
Setup the project
The initial setup steps you will perform will be the same as the Bouncy Box project. You can review the videos there if you need to.
Create a new 3D Unity project named
Platformer.
Locate the default SampleScene in the Project Window and rename it to
Scene01.
Add a Cube to the scene and rename it to
Platform.
Change the background color of the game.
Select the Main Camera and expand the Camera component in the Inspector Window.
Select Solid Color from the Clear Flags drop down.
Click on the color selector box of the Background property and select a sky blue color.
Select Orthographic from the Projection drop down so the camera will reveal a two-dimensional view instead of a 3D perspective view.
Change settings of the Scene Window to have a 2D view:
1. Press the 2D button so the Scene is in 2D view
2. Turn off the skybox through the Scene Effects drop-down menu.
3. Zoom and pan so the outline of the camera outlines the scene view.
If you play the game now, you will notice the background is light blue. However, when editing in Scene view the background is a different color. It would be helpful if the color in the Scene Window matched the color of the Camera background.
Go to Edit > Preferences > Colors and click on color for the Background of the Scene. Use the eye-dropper tool to select the same color of blue used on the Camera.
Create an empty game object named
Platformsto store all the platforms you add to the scene. Reset the position of Platforms to 0, 0, 0. Then drag the Platform to be a child of Platforms.
Position the Platform near the bottom of the camera view and scale it horizontally so it extends to the right of the camera view. This is the platform where the player will begin, and they will move to the right to find more platforms and progress through the level. Be sure the Z value of the Platform's position is at 0 so objects do not fall in front or behind the platform.
Create a material for your platforms and add it to the first platform you created. To keep things organized, place all materials you create in a
Materialsfolder.
It will be a bit tedious to create a cube and add the material for every platform you create. It would be nice to have a Platform prefab with the correct material that can just be dragged into the scene.
Create a
Prefabsfolder within Assets and drag the Platform from the Hierarchy into the Prefabs folder.
Now that you have a Prefab, use it. Drag the Platform prefab into the Hierarchy adding it as a child to Platforms. Move and scale the new platform as desired ensuring the Z value is set to 0.
You can play the game now to check it out. However, it is difficult to test without any movement controls. Before adding more platforms, setup a player character with a player controller.
Standard Assets
Unity provides some Standard Assets to get a project quickly off the ground. For this project, you will import the Standard Assets from Unity using the Unity Asset Store.
Open the Asset Store and search for Standard Assets. Select the Standard Assets provided by Unity.
After you click Import, you will be shown a screen of which files to import (the Import Unity Package window). Before importing the files, you need to designate only the files that you will need for this project. First, uncheck the SampleScenes and StandardAssets boxes to deselect everything. Then, select only the elements shown in the below picture.
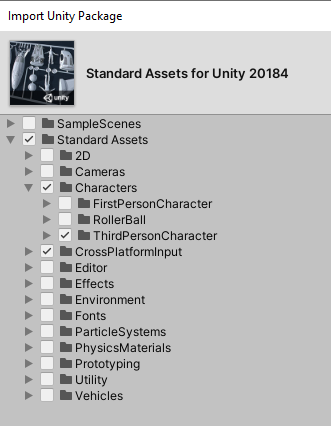
The video below shows how to navigate the Import Unity Package screen and select only the correct assets to import.
After importing, return to the Scene view. In the Project window, notice there is now a Standard Assets folder within Assets. Play the game to ensure there are no errors.
If you have errors, delete the Standard Assets folder and then re-import them being careful to select only what was needed for the ThirdPersonCharacter.
In the Project Window, locate the ThirdPersonCharacter prefab at Assets > Standard Assets > Characters > ThirdPersonCharacter > Prefabs.
Drag the ThirdPersonCharacter into the Scene and set its position to 0, 0, 0. This will center the character in the camera view.
In the Hierarchy, double-click on the ThirdPersonController to zoom in and focus on it. Set the Y value for it's rotation to 180 so the character is facing the camera. If the character's Capsule Collider component is expanded, you will see a green outline of the collider that is about the same size as the character's mesh.
Play the game. You should be able to move around using A W S D keys and jump using the spacebar. Notice however that the character's Z value changes so he soon falls in front or behind the platform.
You might be able to add a constraint as you did with the Bouncy Box to keep the character's position on the Z axis from changing. However, you can also do this with a light-weight script. By using a script, you can customize the way the constraint works.
Add a
Scriptsfolder in Assets. Create a script within the Scripts folder named
LockOnZthat will be used on any object whose position on the Z axis should be continually reset to zero.
Open the script and remove the comments. Use the Update method to constantly reset the position on Z axis back to 0, allowing only the x and y values to be changed by player movement.
using System.Collections;
using System.Collections.Generic;
using UnityEngine;

public class LockOnZ : MonoBehaviour
{
    void Start()
    {

    }

    void Update()
    {
        transform.position.z = 0;
    }
}
Save the script and return to Unity. You should have an error relating to the Transform.position not being a variable. This is because in Unity; the x, y, and z properties of the position (and any other Vector3 objects) are read-only... they cannot be directly modified.
So how do you reset the z value if it is read-only? Fortunately, you can set the individual x, y, and z values by changing the entire Vector3 object. Change the code in the Update to:
void Update()
{
  float x = transform.position.x;
  float y = transform.position.y;
  transform.position = new Vector3(x, y, 0);
}
Save and return to Unity. With no errors, you can attach the script to the ThirdPersonController. Then, with the ThirdPersonController selected, play the game and check to make the character's position on the Z axis remains zero, even when using W or S to run toward or away from the camera. This script should now be keeping the player from falling off the front or back of the platform.
Unity's Transform.position is considered a struct data type, which means that it can only be updated all at once.
For more information on how Transform and Vector3 works, you can read the Unity Vector3 Documentation or the Unity Transform.position documentation.
For more information on how Transform and Vector3 works, you can read the Unity Vector3 Documentation or the Unity Transform.position documentation.
The script is working, but not really in the way it's name suggests. The script is locking the object it is attached to on the Z axis with a position of 0. If the object did not start with a Z value of zero, it actually moves the object on the Z axis from its initial starting point.
The name of the script suggests that the Z value is locked on whatever value it begins with. In this case, the initial value is zero, but the script would be more useful in a wider variety of contexts if lock an object on the Z axis based on it's initial position.
Add a private variable named z of type float. In the start method, initialize the property using the objects initial position's Z value.
private float z;

void Start()
{
    z = transform.position.z;
}
Then use that z value instead of 0 when setting the position vector.
void Update()
{
  float x = transform.position.x;
  float y = transform.position.y;
  transform.position = new Vector3(x, y, z);
}
With the ThirdPersonController selected, play the game again. The player should still be locked on the z-axis. While the game is still running, adjust the Jump Power of the Third Person Character component (script) that came attached to the ThirdPersonController. Tweak this value until the character's jump height is to your liking.
When you stop playing the game, the value of Jump Power will revert back to the value it had before you played the game. Changes to properties while the game are playing are not saved. After the game has stopped, set the Jump Power back to your preferred value.
Camera Movement
The player is able to run right out of the camera view. That's not so great.
The camera needs to follow the character through the scene. This can be done with a simple script.
Create a script named
Follow. The choice of such a generic name (as opposed to
CameraBehaviorfor instance) reflects the wide range of possible uses the script will have.
Basically, the completed script may be added to any object and set to follow any other object. In this specialized case, the camera will follow the player!
Attach the script to the Main Camera.
Open the script and update the code to the following:
using System.Collections;
using System.Collections.Generic;
using UnityEngine;

public class CameraController : MonoBehaviour {

  public GameObject target;

  void Update () {
    transform.position = new Vector3(target.transform.position.x, target.transform.position.y, transform.position.z);
  }
}
The Start method is not needed because there are no properties to initialize. The target property is public so will be initialized in the editor.
As you might suspect, the target property will store the GameObject that the Main Camera will follow.
In the Update method, the position of the Main Camera (transform.position) is set to a new Vector3 defined by the position of the target (the object it is set to follow).
Save the script and return to Unity. Drag the ThirdPersonController from the Hierarchy to set the target of the Follow script attached to the Main Camera.
Move the Game Window into a different panel than the Scene window and play the game. You should see the camera follow the character through the scene.
This script works well for Orthographic cameras because there is no concern with the camera being directly on top of the player.
If the character model, animation, or behavior is not quite what you want, do not fret. As you become more adept with game programming, you will be able to create your own custom controllers, 3D models, and animation; or you will work in teams with those who have these specialized skills.