Bouncy Box
In this tutorial, you will use two methods of moving an object in the scene to create your first game called Bouncy Box inspired by the popular game of 2014, Flappy Bird. In the process, you'll learn how to build a 2D game, use RigidBody components to take advantage of Unity's physics system, use Time.deltaTime, create Prefabs, build upon an Empty GameObject to create a GameController, spawn objects in the scene on a timed interval, destroy objects upon collisions, and access properties and methods of one script from another script.
Setup the project
Create a new 3D Unity project named BouncyBox.Locate the default SampleScene in the Project Window and rename it to Scene01.
Add a Cube to the scene and rename it to Box.
Remember to save your changes often by clicking File -> Save or by pressing CTRL + S
If you play the game, you will see that the box stays floating in the air.
Remember to stop the game before making changes!
Add a Rigidbody component to the cube so that it falls when the game is played.
Switch to 2D
Bouncy Box will be a 2D game. Unity provides this capability.
First let's change the background color of our game.
With the Main Camera selected, expand the Camera component in the Inspector Window.
Select Solid Color from the Clear Flags drop down.
Click on the color selector box on the Background property and select a dark gray color
Select Orthographic from the Projection drop down so the camera will reveal a two-dimensional view instead of a 3D perspective view.
If you go back to the Scene Window, you will notice that it still looks 3D even though the game preview looks 2D.
To make editing the game easier, we can also make the Scene Window look 2D by changing some settings:
1. Press the 2D button so the Scene is in 2D view
2. Turn off the skybox through the Scene Effects drop-down menu.
3. Zoom and pan so the outline of the camera outlines the scene view.
Play the game again to see how the falling box looks in 2D.
Create a bounce
We want the player to be able to press space to apply an upward to the box. This bounce effect will provide a unique player controller and lead to the core game mechanics of the game.
Create a Scripts folder, then go into the folder and create a script called BoxBehaviour.
Attach the script to the Box GameObject by dragging the script onto it.
Double click on the script to open it in Visual Studio.
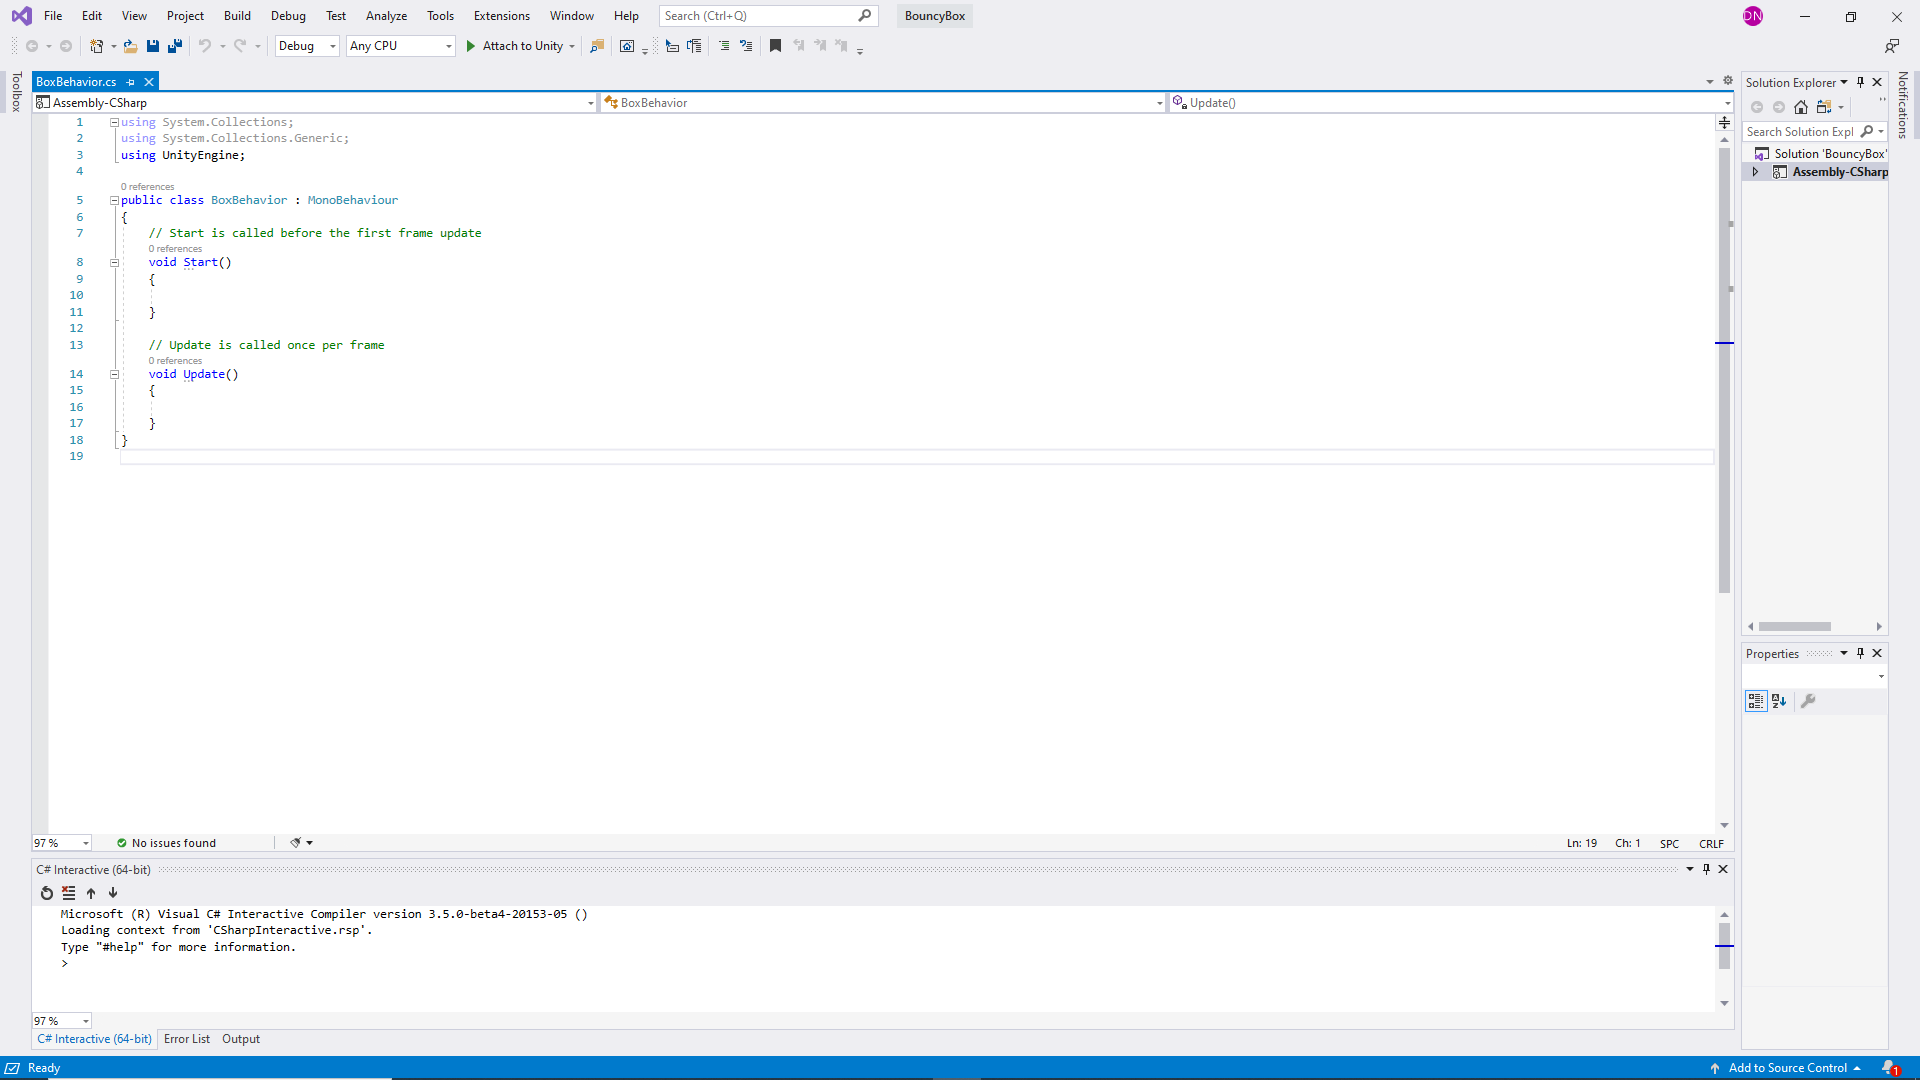
Remove the Start Method since we don't need this.
Then add the following public variables which we will use throughout the game.
using System.Collections;
using System.Collections.Generic;
using UnityEngine;

public class BoxBehavior : MonoBehaviour
{
    public float flapForce = 80;
    public float health = 100;
    public int numCoins = 0;

    // Update is called once per frame
    void Update()
    {

    }
}
We want to push the box up when we press the spacebar. This can be done by checking if the spacebar is pressed and then giving an upward force to the box.
We will put this in the Update() method so that it is checked every frame.
using System.Collections;
using System.Collections.Generic;
using UnityEngine;

public class BoxBehavior : MonoBehaviour
{
    public float flapForce = 80;
    public float health = 100;
    public int numCoins = 0;

    // Update is called once per frame
    void Update()
    {
        if(Input.GetKeyDown(KeyCode.Space))
        {
            GetComponent<Rigidbody>().AddForce(0, flapForce, 0);
        }
    }
}
AddForce() takes in a Vector3. This means it takes in an X value, a Y value and a Z value. In our case, we only want to add a force to the y-axis, so we pass in our flapForce variable into the second parameter.
Save your script then go back to the Unity Editor. The public properties should appear within the Inspector Window for the Box object.
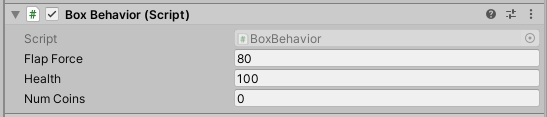
You will likely need to increase the Flap Force so the bounce is detectable during gameplay when the space bar is pressed.
Now play the game and tap space to keep the box from falling.
Let's take a closer look at the code in the Update() method:
if(Input.GetKeyDown(KeyCode.Space))
{
    GetComponent<Rigidbody>().AddForce(0, flapForce, 0);
}
First we create an if statement with the condition Input.GetKeyDown(KeyCode.Space). This returns True or False depending on if the Key has been pressed.
We then use the GetComponent function which returns the component of the specified type from a specified GameObject.
However, we did not need to specify the GameObject. When no GameObject is specified, the GameObject that the script is attached to is used. In fact, the same command could have been written as:
this.gameObject.GetComponent<Rigidbody>().AddForce(0, flapForce, 0);
where this.gameObject refers to the GameObject that this instance of the script is attached to—in this case, the Box.
Once we have access to the Rigidbody using the GetComponent method, the AddForce method of the Rigidbody class is used to add a force with the value of 0 along the x axis, the value of flapForce along the y axis, and the value of 0 along the z axis.
Add constraints
Currently, the box can bounce upward or fall downward right out of the camera view. It is time to constrain the box so it remains in the player's view.
Add another cube to the scene and name it Floor. Change the scale and position of the Floor to serve as a bottom constraint for the box.
Be sure that the z value of the Floor's position is set to zero so that the box does not fall in front of or behind it.
Once in place, the box should fall and come to rest on the floor when the space bar is not being pressed.
In the Hierarchy Window, right-click on the Floor and select Duplicate. Rename the Floor (1) cube created to Ceiling. Move the ceiling upward to serve as the top barrier for the box.
Playing the game now it may seem as though the box is constrained by the Floor and Ceiling GameObjects. However, you will notice that collisions cause the Box to rotate and if space is repeatedly pressed the box will quickly move forward or back on the z axis and then fly in front or behind the ceiling.
To fix this problem, we can edit the constraints of the Rigidbody to freeze the Rotation and freeze the Position.
Make sure that X, Y and Z are checked for Freeze Rotation and that only X and Z are checked for Freeze Position. We do not want to freeze the Y position as we want the box to move up and down.
Play the game and you should see that the box no longer rotates and only the y value of the box's position changes.
In later steps you will be spawning GameObjects that fly into view from the right side of the scene. To ensure the player has time to dodge these objects, move the Box to the left side of the scene.
Add color
Create a Materials folder in the Assets folder of the Project Window.
Right-click within the Materials folder and select Create > Material. Name the material boxMat.
With boxMat selected, change the color for the material in the Inspector Window by clicking on the color selector box next to the Albedo property.
Use the color selector to choose the color for the box. Avoid red and yellow as those colors will be used later in the game.
Drag the boxMat material from the Project Window into the Scene Window and drop it onto the Box. The box should immediately change to the color you selected and the material should appear as a component on the Box within the Inspector.
Within the Materials folder, create another material named wallMat, set the color you want to use for the floor and ceiling, and then drag the wallMat onto the Floor and Ceiling GameObjects.
Add a fireball
In the game, fireballs will move across the screen. While the Box relied on the physics engine for its movement (forces being applied to a Rigidbody), the fireballs will move through code that directly modifies their position values. First, we need to create a single fireball.
Create a Sphere in the same manner you created the cubes and name it Fireball. Then create a material named redMat with a red color and apply it to the Fireball.
It is common practice to reset the Transform of new objects before moving them. This will set the object's position to (0,0,0), the rotation to (0,0,0) and the scale to (1,1,1).
You can do this by clicking the 3 dots at the top right of the Transform component, then clicking Reset.
Now that the object is reset, position the Fireball to the right side of the Scene outside of the view of the Main Camera.
In the Scripts folder, create a new script named FlyLeft. Attach the script to the Fireball.
You may wonder why the name FlyLeft was used instead of FireballBehaviour. This is because this script will be used for any objects that need to have the behavior of flying left. You will be using this same script for other flying objects in the game.
Let's start by adding some variables to the class:
Add two public float variables called minSpeed and maxSpeed. These will be used to give the flying object a random speed between these two values.
Add another variable called speed but do not make it public. This variable will store the random speed generated by the min and max values, so we do not want to show this in the inspector.
using System.Collections;
using System.Collections.Generic;
using UnityEngine;

public class FlyLeft : MonoBehaviour
{

    public float minSpeed;
    public float maxSpeed;
    float speed;

    // Start is called before the first frame update
    void Start()
    {

    }

    // Update is called once per frame
    void Update()
    {

    }
}
Now we can generate a random speed based on these variables using the Random.Range() function.
We will do this in the Start() function so that the value is generated once, at the start of the game.
public class FlyLeft : MonoBehaviour
{

    public float minSpeed;
    public float maxSpeed;
    float speed;

    // Start is called before the first frame update
    void Start()
    {
        speed = Random.Range(minSpeed, maxSpeed);
    }

    // Update is called once per frame
    void Update()
    {

    }
}
Now we need to move the object to the left. We can do this using the transform.Translate() function.
This method will move the object based on a vector that we pass into it.
public class FlyLeft : MonoBehaviour
{

    public float minSpeed;
    public float maxSpeed;
    float speed;

    // Start is called before the first frame update
    void Start()
    {
        speed = Random.Range(minSpeed, maxSpeed);
    }

    // Update is called once per frame
    void Update()
    {
        transform.Translate(Vector3.left * speed * Time.deltaTime);
    }
}
Here we pass in Vector3.left which returns a Vector3 with values (-1,0,0). This means that we want it to move -1 on the x-axis (to the left).
We then multiply this vector by the speed variable, so the vector becomes (-1 * speed, 0, 0). Now the box will move by the amount of the speed instead of just 1 unit.
Finally we multiply by Time.deltaTime which will ensure that the object moves independent of the framerate. But what does that mean?
First, consider how this might be done if the framerate was consistent and known. If the framerate was 100 fps, each frame the object would need to move 1/100th of the desired speed (speed * 0.01). If the framerate was 40 fps, each frame the object would need to move 1/40th of the desired speed (speed * 0.025). We can get this multiplier using Time.deltaTime.
Time.deltaTime is the amount of seconds it took for the game to process the previous frame.
It calculates this using your computer's internal clock to compare the system time when the game started processing the previous frame to the system time when the game started processing the current frame.
Since Time.deltaTime gives a good estimate as to how long a frame takes, we can multiply our movement by Time.deltaTime so that the object moves a proportional distance each frame.
This means that no matter the frame rate of the game, the object will always move the same amount per second. This is framerate independence!
Save your script and go back into the Unity Editor.
If you play the game now, the Fireball will likely not fly as expected. This is because no default values were given to minSpeed and maxSpeed. If you look at the Script attached to the Fireball in the Inspector, you see that the values for minSpeed and maxSpeed are both zero. This is the default value for floats in C# when no other value is given.
In the Inspector, set the value of minSpeed to 5 and the value of maxSpeed to 10. This should make the Fireball move across the screen.
If you let the fireball collide with the box, you will see some unwanted behavior. While the Box is mostly constrained, the collision can affect the Box's upward or downward motion.
To fix this, use the checkbox in the SphereCollider component of the Fireball to set the isTrigger property to true.
When a Collider is set to be a trigger, none of the physical interactions that result when two objects collide will occur. The collider instead will be used only as a trigger, which will be used in a moment to trigger an event in code. In the Bouncy Ball game that event will be to deal damage to the player.
Currently, only one fireball flies across the screen. That is a great start! Now let's make the game keep spawning fireballs.
Spawn fireballs
To spawn fireballs, you will set up a GameController that drops new fireballs into the game on a timed interval. The first step is to turn the Fireball into a Prefab that can be used to generate many fireballs.
Create a folder within the Assets folder named Prefabs. Drag the Fireball GameObject from the Hierarchy into the Prefabs folder. Notice the icon next to the Fireball in the Hierarchy changes to indicate it is an instance of a prefabricated GameObject.
By making an object a prefab, we can easily make multiple copies of it and if we decide to make a change to the prefab, this will update all copies at once!
Right-click on the Fireball in the Hierarchy and select Delete. Yes, it is ok to delete the Fireball from the scene because the Fireball Prefab saved in the Prefabs folder will be used to spawn more fireballs.
Right-click within the Hierarchy Window and select Create Empty. Change the name of the Empty GameObject to GameController and reset its Transform.
In the Scripts folder, create a new script named GameController and add the script to the GameController GameObject. As you might suspect, the GameController script will be used as the master controller for the game.
Open the GameController script so you can start adding code. First delete the start method, then create two float variables named fireballSpawnTime and fireballTimeElapsed.
fireballSpawnTime is the time we want between spawning variables. This variable will be public so we can edit.
fireballTimeElapsed will keep track of the amount of time since the last fireball was spawned.
using System.Collections;
using System.Collections.Generic;
using UnityEngine;

public class GameController : MonoBehaviour
{
    public float fireballSpawnTime = 3;
    float fireballTimeElapsed = 0;

    // Update is called once per frame
    void Update()
    {

    }
}
In order to count the time that passes, we can add Time.deltaTime every frame.
public class GameController : MonoBehaviour
{
    public float fireballSpawnTime = 3;
    float fireballTimeElapsed = 0;

    // Update is called once per frame
    void Update()
    {
        fireballTimeElapsed += Time.deltaTime;
    }
}
Now we just need to create an if statement to check if the time elapsed is greater than the fireballSpawnTime. This means that enough time has passed.
If this is true then we need to reset fireballTimeElapsed and spawn a fireball. Before we spawn fireballs, we can make sure the code works by just printing
spawn fireball
public class GameController : MonoBehaviour
{
    public float fireballSpawnTime = 3;
    float fireballTimeElapsed = 0;

    // Update is called once per frame
    void Update()
    {
        fireballTimeElapsed += Time.deltaTime;

        if(fireballTimeElapsed > fireballSpawnTime)
        {
          fireballTimeElapsed = 0;
          print("spawn fireball");
        }
    }
}
Save the script and go back into the editor. Run the game and look at the console to see what happens.
You should see
spawn fireballprinted every 3 seconds.
Now let's actually spawn Fireball objects!
Before a Fireball can be spawned, the script must have access to the Fireball prefab. Add a public property named fireballPrefab that is of type GameObject.
public class GameController : MonoBehaviour
{
    public GameObject fireballPrefab;

    public float fireballSpawnTime = 3;
    float fireballTimeElapsed = 0;

    // Update is called once per frame
    void Update()
    {
        fireballTimeElapsed += Time.deltaTime;

        if(fireballTimeElapsed > fireballSpawnTime)
        {
          fireballTimeElapsed = 0;
          print("spawn fireball");
        }
    }
}
The property is not initialized here as this can be done in the Unity Editor. Save your script and return to the editor. Click on the GameController object and in the inspector window you will see the Fireball prefab property that you created.
One method to set the property is to click on the target icon that is on the right side of that field and then select Fireball from the options.
Now that there is a reference to the Fireball prefab, the GameController script will be able to use that reference (i.e. the fireballPrefab property) to spawn fireballs.
Now go back into the GameController script and update the conditional statement to the following.
public class GameController : MonoBehaviour
{
    public GameObject fireballPrefab;

    public float fireballSpawnTime = 3;
    float fireballTimeElapsed = 0;

    // Update is called once per frame
    void Update()
    {
        fireballTimeElapsed += Time.deltaTime;

        if(fireballTimeElapsed > fireballSpawnTime)
        {
          fireballTimeElapsed = 0;

          GameObject fireball = Instantiate(fireballPrefab);
        }
    }
}
Here we use the Instantiate() method which is used to create a game object while the game is running. In this case, we create an instance of the Fireball object every 3 seconds and store a reference to that instance in the fireball.
At the moment, all the fireballs will spawn in the same position (wherever the prefab was initially positioned). Let's change this so that each fireball spawns in a random position.
public class GameController : MonoBehaviour
{
    public GameObject fireballPrefab;

    public float fireballSpawnTime = 3;
    float fireballTimeElapsed = 0;

    // Update is called once per frame
    void Update()
    {
        fireballTimeElapsed += Time.deltaTime;

        if(fireballTimeElapsed > fireballSpawnTime)
        {
            fireballTimeElapsed = 0;

            GameObject fireball = Instantiate(fireballPrefab);
            float x = fireball.transform.position.x;
            float z = fireball.transform.position.z;
            float y = Random.Range(-3f, 5f);
            fireball.transform.position = new Vector3(x, y, z);
        }
    }
}
Here we create float variables to store the current x and y position of the Fireball. We then use the Random.Range method to set the value of the local variable y to a random float between -3 and 5.
To determine the numbers for your game, drag the Fireball prefab into your scene within Unity to create a new Fireball GameObject. Move it up and down watching the y values for the position changing in the Inspector Window. Once you have determined the min and max values, delete the Fireball from the Hierarchy Window.
Finally we create a new Vector3 (which holds an x, y and z value) and set the fireball's transform.position to this vector.
Save your script and go back into the editor to test your game.
When you play the game, you should see new Fireball GameObjects appearing in the Hierarchy Window. As the game continues the list of fireballs grow.
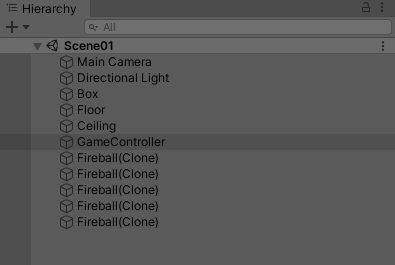
This is concerning! For each new fireball, the required processing power needed to move the fireballs and check for collisions increases. The framerate will slow and eventually the game may crash.
The solution is to destroy the Fireballs from the scene after they have left the camera view.
Destroy fireballs
To maintain performance and a desired frame rate for your game, you should always destroy objects that are no longer needed in the game. As fireballs continually spawn during the entire game, it is important that they are also destroyed.
Where in our scripts should the destroy code be added? Well, logically we would want to check if the fireball has moved off screen every time the fireball’s location changes. The code for moving the fireball was in the FlyLeft class, so this is the script where we will add the destroy code.
In FlyLeft.css, add the conditional statement to the Update method.
public class FlyLeft : MonoBehaviour
{

    public float minSpeed;
    public float maxSpeed;
    float speed;

    // Start is called before the first frame update
    void Start()
    {
        speed = Random.Range(minSpeed, maxSpeed);
    }

    // Update is called once per frame
    void Update()
    {
        transform.Translate(Vector3.left * speed * Time.deltaTime);

        if(transform.position.x < -12)
        {
            Destroy(gameObject);
        }
    }
}
Remember, gameObject (or this.gameObject) refers to the GameObject that this instance of the FlyLeft class is attached to. In this way, the correct Fireball is destroyed when it moves far enough to the left (i.e. when the x value of its position becomes less than -12). Again, you can decide how far left to allow the fireballs to go by temporarily moving a Fireball around the scene.
Playing the game now you should see that Fireballs are destroyed from the Hierarchy after they fly out of view.
Collision damage
Fireballs should also be destroyed, as well as deal damage, when they collide with the box.
Your first instinct may be to add this code in the FlyLeft script since it logically would need to check for collisions every time the fireball is moved. However, it is good to have the FlyLeft script only be responsible for one task (i.e. flying left) so that it may be used on any objects which need the flying left behavior without other behaviors (such as dealing damage) that are specific to fireballs. Fortunately, you can add multiple scripts to the same GameObject.
Create a script named DamageOnCollision within the Scripts folder. To add the script to the Fireball prefab, click on the Fireball in the Prefabs folder. Click on the Add Component button. Clear the search bar if needed. Click on Scripts and choose "Damage on Collision".
Now open the script. You can delete both the start and update methods as they are not needed.
Instead we will use the OnTriggerEnter method to check for collisions.
using System.Collections;
using System.Collections.Generic;
using UnityEngine;

public class DamageOnCollision : MonoBehaviour
{
    private void OnTriggerEnter(Collider other)
    {
        if(other.tag == "Player")
        {
            Destroy(gameObject);
        }
    }
}
The OnTriggerEnter method is provided by Unity and is executed anytime the Collider attached to the GameObject that this script is attached to (i.e. a Fireball) comes into contact with a Collider attached to any other GameObject (e.g. the Box).
In this case, the Collider that collided with the Fireball is passed to the method in the variable named other. This provides a reference to the other Collider, and so the other GameObject, that collided with the Fireball.
This condition could be read as "if the other Collider's GameObject is tagged as a Player". This condition is important because damage should only be dealt when the Fireball collides with the player, not when it collides with the floor, ceiling, or other fireballs.
Before this code will behave as intended, the Box GameObject needs to be tagged as a Player. With the Box displayed in the Inspector, choose Player from the Tag dropdown menu.
Player is one of the default tags provided by Unity. Additional tags can be created using the Add Tag… option at the bottom of the dropdown list.
When you play the game now, the fireballs should be destroyed when they collide with the Box (i.e. the Player).
The last step is to have the fireball deal damage to the player during the collision.
Recall that the BoxBehaviour script has a public health property. Because the property is public, other classes (including the DamageOnCollision class) can access it.
Update the DamageOnCollision script to the following.
using System.Collections;
using System.Collections.Generic;
using UnityEngine;

public class DamageOnCollision : MonoBehaviour
{
    public float damage = 10;

    private void OnTriggerEnter(Collider other)
    {
        if(other.tag == "Player")
        {
            other.GetComponent<BoxBehavior>().health -= damage;

            if(other.GetComponent<BoxBehavior>().health <= 0)
            {
                Destroy(other.gameObject);
            }

            Destroy(gameObject);
        }
    }
}
First we create a new public variable named damage which defines the amount of damage this object will deal to the player upon collision. The value for damage could be set to zero in the Inspector if the object is not intended to deal damage.
Back inside the if statement, we demonstrate how one class can access another class that belongs to a different object. In this case, the DamageOnCollision class that is attached to a Fireball needs to access the BoxBehaviour class that is attached to the Box. After the GetComponent method is used to access the BoxBehaviour class that is attached to the other GameObject, the public properties (e.g. health) can be accessed and modified. The first thing we do is reduce the Box's health by the Fireball's damage.
The following conditional statement destroys the other GameObject (i.e. the Box) if its health drops to or below zero.
To test, save the code, select the Box so the value of health is visible in the inspector, and press Play. The value of health displayed in the Inspector should reduce every time a fireball hits the Box and the player should be destroyed when the health falls to zero.
Ending the game
When the player dies, there is no need to continue spawning new GameObjects. One solution is to disable the GameController when there is no longer a player in the scene.
Add the following conditional statement at the top of the Update method of the GameController class.
public class GameController : MonoBehaviour
{
    public GameObject fireballPrefab;

    public float fireballSpawnTime = 3;
    float fireballTimeElapsed = 0;

    // Update is called once per frame
    void Update()
    {
        if(GameObject.FindWithTag("Player") == null)
        {
            print("Player has been destroyed. Game Over.");
            this.enabled = false;
        }

        fireballTimeElapsed += Time.deltaTime;

        if(fireballTimeElapsed > fireballSpawnTime)
        {
            fireballTimeElapsed = 0;

            GameObject fireball = Instantiate(fireballPrefab);
            float x = fireball.transform.position.x;
            float z = fireball.transform.position.z;
            float y = Random.Range(-3f, 5f);
            fireball.transform.position = new Vector3(x, y, z);
        }
    }
}
The FindWithTag method returns the GameObjects in the scene which have the specified tag. The value of null is returned if no GameObjects in the scene have the tag. Therefore, this code is simply checking to see if the Box (the only GameObject with the tag of Player) has been destroyed. If it has, a game over message is printed to the console and the enabled property of this script (i.e. the GameController class) is set to false.
With the GameController showing in the Inspector, you should see when the player dies the checkbox next to the script name automatically toggles off at the same time the game over message appears in the console.
Enabling and disable components (including scripts) or entire GameObjects can be a powerful tool for a Unity developer.
GoodStuff challenge
Challenge yourself by adding some good stuff to the game!
Update Bouncy Box to allow the player to gain coins by colliding with yellow GoodStuff GameObjects that move across the screen at a faster rate than the Fireballs. The goal for the player is to gain as many coins as possible before their health is depleted.
The completed game should play like this:
The following steps should help you complete this challenge.
- Use a sphere with a yellow material to create a GoodStuff GameObject.
- Scale the GoodStuff GameObject down or scale up the Fireball prefab so the GoodStuff is smaller than the fireballs.
- Add the FlyLeft script to the GoodStuff and increase the properties for the min and max speed so that GoodStuff moves faster on average than the fireballs.
-
Create a Prefab from the GoodStuff and update the GameController to spawn GoodStuff in the same manner that the Fireballs are spawned. Here is a portion of the updated code:
public class GameController : MonoBehaviour { public GameObject fireballPrefab; public GameObject goodStuffPrefab; public float fireballSpawnTime = 3; float fireballTimeElapsed = 0; public float goodStuffSpawnTime = 1.2f; float goodStuffTimeElapsed = 0; - Create a CoinOnCollision script to provide additional behavior to the GoodStuff. When the GoodStuff collides with the player, it should be destroyed and the value of numCoins (a property previously defined for the BoxBehaviour class) should increase by one.
- Add print statements to provide output to the player, including displaying the player's number of coins each time a coin is collected and the player’s health each time damage is dealt.
Wrap-up Activity
Bouncy Box Playthrough
When you have finished creating your version of Bouncy Box, record a video screen capture of you playing the game that demonstrates inclusion of all required elements. View the rubric for this project below for a complete list of required elements.The recording created should be long enough to demonstrate your inclusion of required elements without exceeding one minute. If elements are placed far apart in an expansive world, you may edit the video to remove portions that are not necessary.
How did you do? Take a moment to reflect by completing the Evaluation Rubric for the Bouncy Box Playthrough.
You may Create a Copy of the Evaluation Rubric for your own use.