Use a Raycast
In this tutorial, you will learn how to create a First Person Shooter (FPS) using Raycasts
Creating a Shooter
Before you begin, download this starter project and unzip it: _ShooterLesson.zip. This project includes basic scripts for controlling the camera with the mouse, a basic level layout, and basic enemies that will chase you around.
Once we have the initial project opened, we need to create the gun that we are going to use for the game. You can find many free gun assets on the Unity Asset store, but in this case we're just going to create a gun asset out of a cube. Then position the model to be in frame in the camera. Make sure the model is a child of the camera, that way it will move where you look.
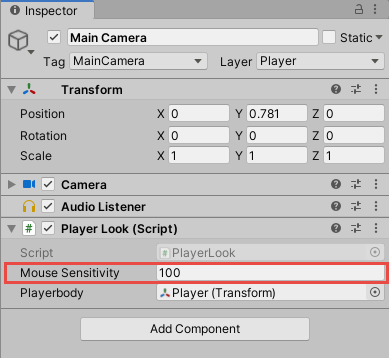
When you test your game, Unity will make your mouse cursor disappear, and you will not be able to click anything else, because your mouse will be used to rotate the character's direction in the game. To get your mouse back while in play mode, press the Esc button.
Making Enemy Pathing AI
We already have an Enemy script and Prefab that looks for the player and deals damage to them on contact. However the enemy still does not know how to move, or track the player in any way. This means we need to add a NavMesh to the scene.
Building a NavMesh means to build a large plane on the terrain, that molds to the shape of the terrain. This then can be used to create pathing AI for enemies and other NPCs.
In the project there is already a folder for all the NavMesh scripts. Create an empty game object and name it
NavMesh. Then add the script NavMeshSurface to the object you just made. Then press Bake to create the NavMesh in the scene.
Now the enemies can find and try to attack the player, and go around obstacles. However if you look closely in the scene the enemies try to avoid the area the player spawns and the boxes. We don't want them to avoid those places, so we need to tell the NavMesh to not avoid certain layers. To do this we need to go to the Include Layers dropdown menu, and uncheck the layers Player and Boxes. Then re-bake the NavMesh on the scene.
Adding a Gun
Now that we have our gun, we can add some code so it can shoot. Create a C# Script named ShootScript. First, let's add the variables for range and damage. We can also remove the Start function and using System.Collections.Generic;. We will not need them for our code.
using UnityEngine;
using System.Collections;

public class ShootScript : MonoBehaviour
{
    public float damage = 10f;
    public float range = 100f;

    void Update()
    {

    }
}
Let's add an if statement to our update function. This way whenever the left mouse button is pressed we tell the code to run the section that fires the gun.
    void Update()
    {
        if (Input.GetButtonDown("Fire1"))
        {

        }
    }
It is time to make our gun shoot. We will do this using a Raycast instead of a projectile. A raycast is the action of creating an invisible ray that fires out in one direction, and it will detect anything that has blocked its path. Imagine if you create a line extending out from a location, and you track whether that line intersects with any colliders.
We will use the raycast to detect the object in front of the player's gun when the player fires. First, we need to tell it to fire out the middle of the camera, so we need to make a reference to the camera we are using. Then we create a RaycastHit object to track information related to the objects the raycast hit.
public class ShootScript : MonoBehaviour
{
    public float damage = 10f;
    public float range = 100f;

    public Camera cam;

    void Update()
    {
        if (Input.GetButtonDown("Fire1"))
        {
          RaycastHit hit;
        }
    }
}
We can now use the raycast to shoot out the ray and detect the objects it comes in contact with inside of our specified range. To do this we need to make an if statement that checks if an object we shot at is in range. If so, then we can print out the name of the object in the console.
    void Update()
    {
        if (Input.GetButtonDown("Fire1"))
        {
          RaycastHit hit;

          //Fires out from the center of the camera and detects objects that connect with the ray
          if (Physics.Raycast(cam.transform.position, cam.transform.forward, out hit, range))
          {
              //Prints name of object that was hit
              Debug.Log(hit.transform.name);
          }
        }
    }
That is all we need to cause the raycast to fire and detect objects. Now we can add the script to our gun. Like in previous sections, all we need to do is add the script to the Gun object. Then drag the Main Camera into the script, where it says Camera.
Additionally, let's add a way to damage enemies. The enemies in the given project have been pre-programmed to take damage in a certain way inside of the Enemy script. First, we need to get the enemy's script from the object we are hitting.
This code works with the Enemy script found in the project that was provided in the lesson, if you are not using the Enemy script from the project, this code will not function properly.
    void Update()
    {
      if (Input.GetButtonDown("Fire1"))
      {
        RaycastHit hit;

        //Fires out from the center of the camera and detects objects that connect with the ray'
        if (Physics.Raycast(cam.transform.position, cam.transform.forward, out hit, range))
        {
            //Prints name of object that was hit
            Debug.Log(hit.transform.name);

            //Detects if the object it hits has the Script "Enemy"
            Enemy enemy = hit.transform.GetComponent<Enemy>();
        }
      }
    }
Now we need to detect if the object we hit has the script or not. If it does, we will tell the enemy to take damage based on the damage variable that was created earlier.
    void Update()
    {
      if (Input.GetButtonDown("Fire1"))
      {
        RaycastHit hit;

        //Fires out from the center of the camera and detects objects that connect with the ray'
        if (Physics.Raycast(cam.transform.position, cam.transform.forward, out hit, range))
        {
            //Prints name of object that was hit
            Debug.Log(hit.transform.name);

            //Detects if the object it hits has the Script "Enemy"
            Enemy enemy = hit.transform.GetComponent<Enemy>();

            if (enemy != null)
            {
                enemy.TakeDamage(damage);
            }
        }
      }
    }
If you are using the project that was given in the link, you should be able to attack the enemies that spawn in over time!
Adding a Crosshair
Now it's time to add some effects to the gun, that way we know where we are shooting.
To create a crosshair, all we need to do is create a UI Image in unity. Just right click in the Hierarchy and go UI > Image. Then adjust the image size to be 10 by 10 and in the center of the screen (position 0, 0, 0). Select an image you want to use as your crosshair.
If the crosshair is not in the middle of the screen click on the Canvas and go to where it says Screen Space - Overlay. The use the drop down menu and select Screen Space - Camera. Drag the Main Camera into the camera slot. Then change it back to Screen Space - Overlay, this resets the Canvas to be back in front of the camera and acting properly again.