Create a C# Script
In this tutorial, you will learn how to write, attach, and execute a C# script that prints a message to the console.
What is C#?
There are many computer languages that have a wide variety of purposes based on their strengths and weaknesses. Just as natural languages have grammatical rules to define the correct usage of the language, computer languages have syntax rules which define how the code must be written. Using proper syntax is important! While humans are very good at understanding languages when grammar errors are present, computers typically cannot compile or execute scripts that contain syntax errors.
C# (pronounced
C sharp) is the language used to write scripts within Unity. The syntax for C# is mostly consistent with the syntax for other
C-type-languagesincluding C, C++, Java, and JavaScript. For example, in C-type-languages commands end with a semicolon and curly braces are used to group multiple commands together in a block.
C# is a typed language. That is, when defining how data will be stored, the type of data must be defined. For instance, a variable defined with the int keyword may only store integers (1, 2, 3...) while a variable defined with the float keyword may only store decimal numbers (0.9, 1.0, 1.1...).
C# is also case-sensitive. For example, keywords that have specific meaning in the language such as int, float, if, else, void, return, public, class, and so on must be lower-case. Variable and function names defined in the program are also case sensitive. A variable named score is different than a variable named SCORE and a function named attackenemies() is different than a function named attackEnemies().
The ability for programs written in C# to run on different devices and operating systems aligns well with the Unity Engine, which allows games to be published for various platforms. This DOPE (develop once publish everywhere) approach is one of the benefits of using the Unity game engine.
Create a C# Script
Create a new project in Unity.
Within the Assets folder, right-click to create a new folder named "Scripts" to store all of your scripts.
Within the Scripts folder, right-click and select Create > C# Script. Name the script "CubeBehavior".
Prepare an editor
Visual Studio is a popular application used to write programs using a wide range of computer languages. You likely installed Visual Studio in the process of installing Unity.
If you do not already have Visual Studio installed, you may download the free Community version from visualstudio.microsoft.com/downloads
Unity allows users to use any code editor they wish, so you should make sure that Visual Studio is set as the default editor.
- In Unity, select Edit > Preferences from the top menu bar.
- Select External Tools from the Preferences window.
- Select Visual Studio from the External Script Editor drop down menu. If Visual Studio is not listed as an option, select Browse to find the location where you installed Visual Studio on your computer.
- Close the preferences window after setting Visual Studio as your editor.
Edit a C# Script
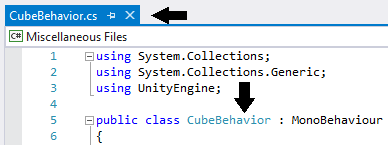
Double-click the CubeBehavior script from within the Scripts folder to open it with Visual Studio.
If you rename a script after creating it, change the class name to match the filename.
The Light color theme of Visual Studio is used throughout this course. To explore more color themes, select Tools > Options > Color Theme from the Visual Studio Community menu at the top.
The initial code generated when creating a script includes a class (CubeBehavior) that contains two functions (Start and Update).
using System.Collections;
using System.Collections.Generic;
using UnityEngine;

public class CubeBehavior : MonoBehaviour
{
    // Start is called before the first frame update
    void Start()
    {

    }

    // Update is called once per frame
    void Update()
    {

    }
}
Line 7 and 13 are comments for the programmer and are ignored when the program executes.
As the comments suggest, any code placed within the Start method (line 10) will execute upon the first frame update. This basically means that code written here will execute only one time at the moment an object which has this script attached enters the game.
As the next comment suggests, any code placed within the Update method (line 16) will execute repeatedly. If the game is running at a frame rate of 60 frames per second (fps), this code will run 60 times every second (assuming the script is attached to an object in the scene).
Start and Update are two of the many built-in functions of Unity and so are automatically called by the engine as the game runs. They are so frequently used that they are provided immediately when a new script is created.
Add a command within the Start method to print a message to the Console. The
Hello World!message is the classic first program for new programmers.
using System.Collections;
using System.Collections.Generic;
using UnityEngine;

public class CubeBehavior : MonoBehaviour
{
    // Start is called before the first frame update
    void Start()
    {
      Debug.Log("Hello World!");
    }

    // Update is called once per frame
    void Update()
    {

    }
}
Now add a new phrase for the Console to say within the Update method.
This script may seem simple, but there is a great deal of room for error. Remember that C# is case-sensitive and that commands (such as those on lines 1, 2, 3, and 10) must end in a semi-colon ;. The syntax highlighting can be helpful in finding errors. In the Light color theme, the keywords are in green and strings which represent a string of characters are in orange. Notice how the color changes if you remove an ending quotation mark.
Indentation is also helpful in finding errors. While this entire script could technically be written on one line of code, the readability of that code would be horrible. Good indentation involves consistently indenting every new block of code. For example, the curly braces on lines 6 and 18 create the block of code that defines the CubeBehaviour class. All commands in this block are indented. Similarly, the curly braces on lines 9 and 11 create the block of code that contains all code belonging to the Start method. The code in this block is indented as well. Leaving off a curly brace or misplacing a curly brace can prevent your code from executing or result in strange behaviors.
Run a C# Script
Let's try to run the program we have written. In Visual Studio select File > Save or press Ctrl S to save your changes. Return to Unity and open the console by clicking on the Console tab next to the Project tab. The output from the print commands we added to the script should appear in the console.
With the Console visible, press the Play button. Did you see any messages appear?
Why did no messages appear?
Remember, that files in your project are not necessarily in every Scene. In Unity, a script needs to be attached to an object in the Scene before it will execute.
You could attach the script to any GameObject in the scene, including the default Main Camera or Directional Light. Instead, add a cube to the scene.
There are several ways you can add the CubeBehaviour.cs script to the cube, including using the Add Component button in the Inspector or by dragging the script from the Project Window into the Scene Window and dropping it directly on the Cube.
Once the script is added successfully, it will appear as a component of the Cube in the Inspector Window.
If needed, click again on the Console tab so the Console is visible. Toggle on the
Clear on Playbutton so that the all old messages, warnings, and errors are cleared from the console every time the code is saved or the Play button is pressed. Then, press the Play button again to check that your script runs as expected.
The console should quickly fill with your messages with the number of messages displayed at the end the of the console list, changing quickly. The message printed from the Update method should repeat continuously. While the message in the Start Method should only print once at the start of the game.
If you do not see the messages, you may need to click on the button which shows the number of messages that have been printed. You can use the buttons at the top-right to filter what is displayed in the console. The two other buttons are used for warnings and errors in your code.
Notice there is a timestamp next to each message. You can get an idea of the number frames per second your game is running at by counting up how many messages are printed in one second (though there are definitely less tedious ways to determine frame rate than this).
Be sure to press the Play button again to stop the game, and stop your script from printing more messages to the console.