Code and Animate a 2D Character
In this tutorial, you will setup the 2D dungeon crawler with a character that can move with animations.
Setup the project
Create a new 2D Unity project named DungeonCrawler. Make sure to select the 2D option.
Locate the default SampleScene in the Assets folder in the Project Window and rename it to Level1.
Then click Reload when it asks you to reload the Scene.
The setting of the game will be in a dungeon so let's make the background color for the Camera black.
You can do this by clicking on the Main Camera object in the Hierarchy Window, then on the Camera component in the inspector, make sure the Clear Flags property is set to Solid Color, then set the Background property to a black color.
You can see what the Game looks like in the Camera Preview at the bottom right of the Scene view. Or you can click on the Game tab to see the actual Game Window.
Remember to save your changes often by clicking File -> Save or by pressing CTRL + S
Create the Character
First let's create a character, add a controller and animate it.
For this tutorial, we will use the free
2D Characters Familyassets by Pondomaniac.
You can download these assets into your project by going opening the Asset Store Window, then searching for 2D character family.
Click on the asset to view it, then click Download and then Import. This will open a pop-up window with all the assets. Make sure all are selected then click Import.
Now in the Project Window you will see a new folder within the Assets Folder called 2d characters family. Open this folder, then go into the Sprites folder to see the different character sprite sheets.
A sprite sheet is just an image that contains smaller images (sprites). Usually the images within a sprite sheet will be used to make up an animation.
The sprite sheets in the 2D characters family package contain sprites that create top-down walk animatons. You can press the arrow on a sprite sheet to see the individual images (sprites) that are inside.
Select one of those individual sprites and drag it into the Scene. This will create a new Game Object with a Sprite Renderer component with the selected sprite.
This tutorial will use the Darwin sprites as the player's character, but you can pick another character of your choosing. Just make sure that you choose between Darwin, Elfi, Maria2, Morse2, Papy2, Super Alex, or Tim. These are the characters which have the sprite sheets able to create animations later.
Rename the new game Object to Player, then reset the transform of the object and tag the object with the Player tag.
Let's add the necessary components to the Player.
Add a Capsule Collider 2D which will be used to detect collision, then resize the collider to fit around the sprite.
Then add a RigidBody 2D which will be used for moving the player.
Edit the RigidBody 2D component by setting the Gravity Scale field to 0. Also set under Constraints check Freeze Rotation for Z.
Now we can script the player to move. First go into the Assets folder, then create a new folder named
Scripts.
Create a new script named
PlayerControllerand attach it to the Player object.
Open the script. First we will declare some variables.
Create a float variable named speed and assign it a starting value of 7f. Use the [SerializeField] attribute on the variable so it will be visible as a field in the Inspector.
Both [SerializeField] and public make variables visible in the Inspector, however public means that other scripts can easily access and change the variable which we might not want. Using [SerializeField] is a more secure way to expose variables to the Inspector.
using System.Collections;
using System.Collections.Generic;
using UnityEngine;

public class PlayerController : MonoBehaviour
{
    [SerializeField] float speed = 7f;

    void Start()
    {

    }

    void Update()
    {

    }
}
Next create a Rigidbody2D variable named rb. This will be used to access the Rigidbody2D component of the player.
In the Start() method get the Rigidbody2D component and assign it to the rb variable.
public class PlayerController : MonoBehaviour
{
    [SerializeField] float speed = 7f;

    Rigidbody2D rb;

    void Start()
    {
      rb = GetComponent<Rigidbody2D>();
    }

    void Update()
    {

    }
}
Now we can actually program the movement. We will do this by creating a Vector2 object with x and y coming from the Unity Input Manager.
In the Update() method, create a Vector2 named v as a placeholder to do operations on. Inside the constructor include the
Horizontaland
Verticalinput axes.
This will read in the desired movement direction using WASD, the arrow keys or even a supported controller and turn it into a Vector2.
public class PlayerController : MonoBehaviour
{
    [SerializeField] float speed = 7f;

    Rigidbody2D rb;

    void Start()
    {
        rb = GetComponent<Rigidbody2D>();
    }

    void Update()
    {
        Vector2 v = new Vector2(Input.GetAxis("Horizontal"), Input.GetAxis("Vertical"));
    }
}
Now we will adjust v so that it is the correct speed in any given direction.
We use the Normalize() function to ensure that the diagonal speed isn't faster than moving just up/down or left/right. Next we multiply by our speed variable so that it is reflected in the movement speed.
    void Update()
    {
        Vector2 v = new Vector2(Input.GetAxis("Horizontal"), Input.GetAxis("Vertical"));
        v.Normalize();
        v *= speed;
    }
Finally, we set the velocity of the RigidBody to be equal to our placeholder Vector2, v.
    void Update()
    {
        Vector2 v = new Vector2(Input.GetAxis("Horizontal"), Input.GetAxis("Vertical"));
        v.Normalize();
        v *= speed;
        rb.velocity = v;
    }
Now save the script and go back into Unity Editor. Play the game and you will be able to move the character using the W, A, S and D keys.
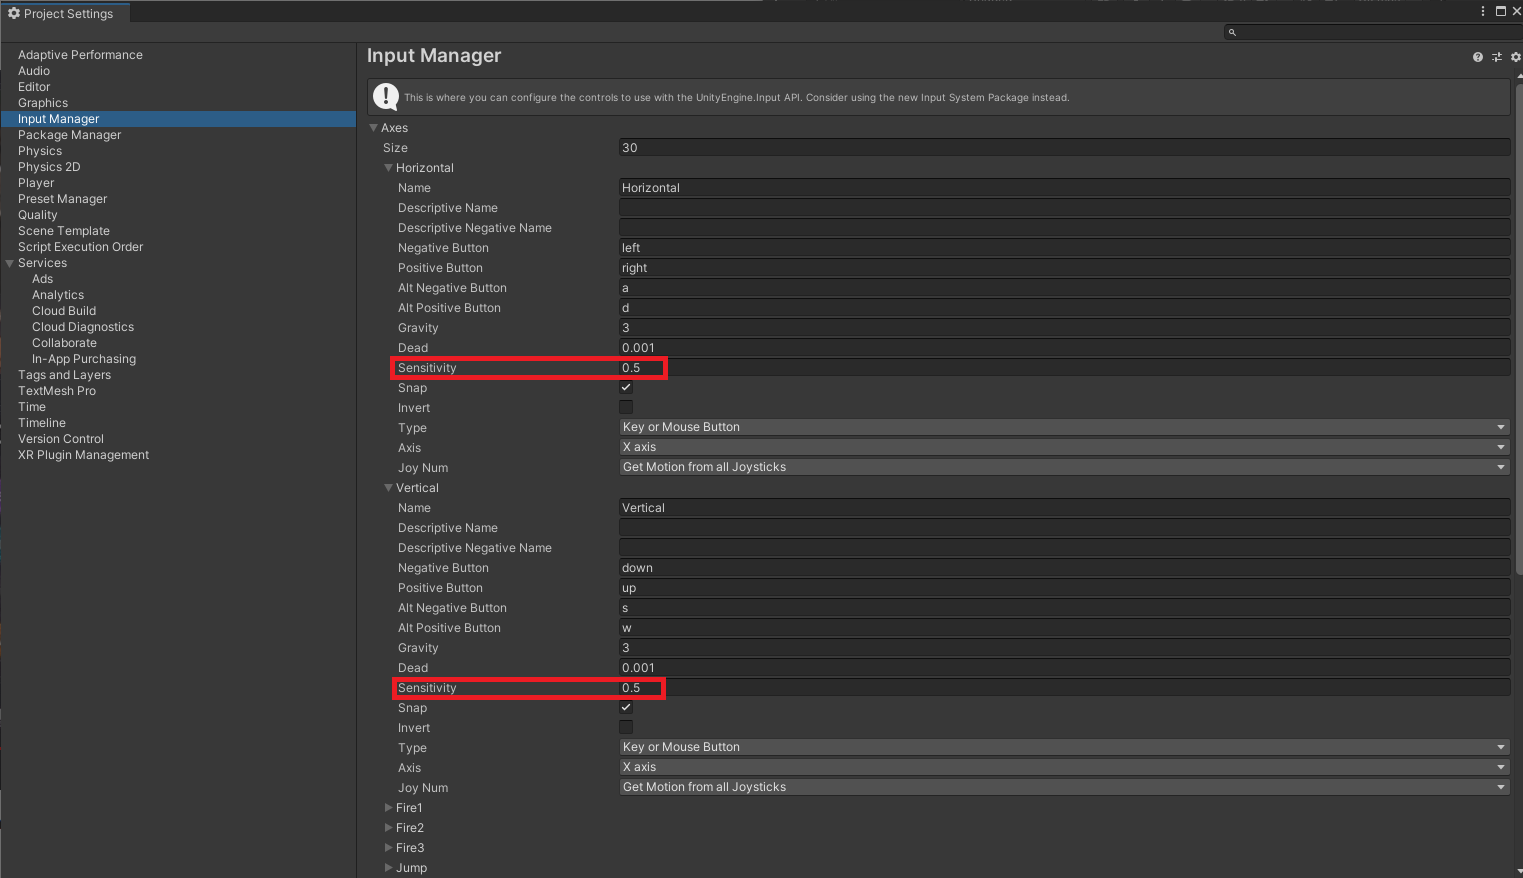
You may notice the movement feels sluggish to slow down when you release the key, we can adjust this by going into our project settings and making changes to the Input Manager.
To do this go to edit, prroject settings, then click on the Input Manager tab and click the dropdown for
Horizontaland
Vertical. From here several options are visible, but for now we will look at the gravity and the sensitivity settings.
Sensitivity is the rate at which an input winds up, try setting yours to 0.5 and seeing how that affects things when you press play. For now return it to the default of 3.
Gravity is the opposite of Sensitivity, it is the hang time of an input, try raising it and seeing how that affects the game when you press play. For now return it to the default of 3.
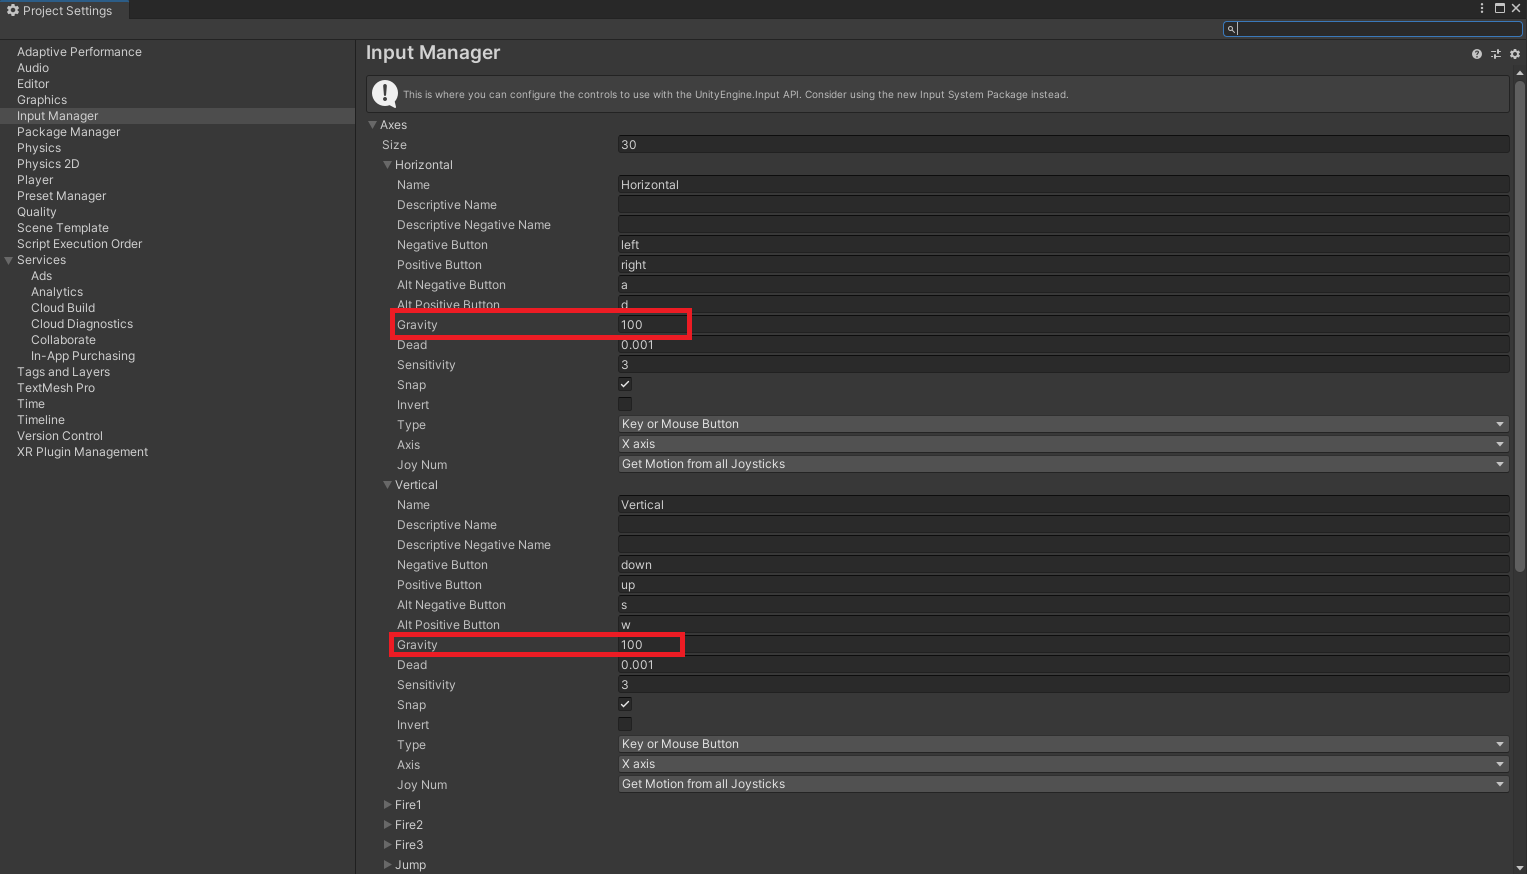
Adjust these values to your liking and see how the different values can adjust how it feels to play the game. When you have found values that feel good to you, feel free to continue.
Animate the Character
Now that we can move the character, let's add animation for the movement.
There are many different ways to animate a character. For 2D games, a common way is by using sprite sheet animation. This works by changing the sprite that is shown in quick succession and this may happen in a cycle/loop for repeating animations.
We will create 4 separate animations for the characters walk; a forwards walk, a backwards walk, a left walk and a right walk.
The first thing we will do is create a new folder within the Assets folder named Animations. This is where we will save animations later.
Now go into the 2d characters family folder then into the Sprites folder. Then click the arrow on the sprite sheet of the character you chose for the Player.
As you can see, some sprites together create a forward walking animation, others create the back walking animation, the left walking animation and the right walking animation.
Select all the sprites that makes up the forward walk animation (where the character is facing towards the you). You can select multiple sprites in the sheet by clicking on one, then holding the control (CTRL) key and clicking on the other sprites that you want to select.
Now drag the selected sprites onto the Player object and you will get a pop-up window asking you where to save the new animation. Locate the Animations folder that you created, then name the file Forward and click Save.
This will do a few things:
- The Player object will now have an Animator component which allows it to play animations. Notice that the Controller field of the component has a value called Player.
- In the Animations folder you will see a special object named Player. This is the Animator Controller that was referenced in the Controller field of the Animator component. The Animator Controller allows you to arrange and maintain animations.
- The Animations folder also contains an animation named Forward. This is the animation that was created from the four frames that you selected in the sprite sheet.
Now in the Animations folder you will see the Player Animator Controller and 4 animations. Notice that a new Animator Controller was not created for each animation. This is because we dragged the animation onto the Player object so the same Player Animator Controller is used for all the animations.
Now we have the animations, let's view them. To do this, we will need to open the Animator Window which allows you to edit Animator Controllers and control animations.
You can open the window by going to Window > Animation then selecting Animator.
Now click on the Player Game Object and you will see boxes appear in the Animator Window. Here you can see the State Machine for the Player Animator Controller. The boxes are called States and represent different animation states of an object. As you can see, the animations we created before are states of the state machine.
As you can see, the Entry state for the Player goes to the Forward animation meaning that that is the default animation that will play. However, we only want this animation to play when the player moves forwards.
Instead, right-click anywhere in the window and select Create State > Empty. This will create an empty state with no animations which we will use as the default state.
Rename the state to Default.
Now right click on the Entry state and select Set StateMachine Default State. You will then have access to an arrow that you can move around from the Entry state. Click on the Default state that you created which will make sure that this empty state with no animations is used by default.
Now we need to setup the animation transitions for the movment states.
Since we should be able to change from one direction to any other direction, the animation transitions will all come from the Any State state. This means that the Player will be able to transition from Any State to another state.
First let's rearrage the states in the window so they are more organised. This will make it easier to create state transitions afterwards.
Now we need to create new transitions from Any State to each of the movement animation states. However this would only cause us to start animations which would then loop forever.
We also need to be able end or exit animations when the player is not moving. To do this we will also create new transitions from each animation state to the Exit state.
To create a new transition, right click on the starting state and select Make Transition. Then move the mouse to the state you want to transition to.
Now that all the transitions are set up, we need to tell the Animator when to do the transitions from one state to another.
When you click on a transition, you will see details of the transition including the source (start) and target (end) state, the transition settings, and a preview of a transition at the bottom.
Click on the transition from Any State to Forward. At the moment, the preview shows a transition from Forward to Forward which is not very useful for testing what the transition will look like.
Instead, change the Preview source state to Back so that the starting state of the preview is different. Then click the play button above the preview to see what the animations and transition looks like.
As you can see, the transition looks good but the individual animations are way too fast.
To change the speed of an animation, click on the animation state then change the value in the Speed field. 1 is the normal speed of the animation. So 2 would be twice as fast, 0.5 would be half speed, etc.
Let's set the speed for all the animations to 0.5 and see what that looks like.
Great, all the animations look good. Now let's edit some of the settings for the transitions.
For each transition make sure Has Exit Time is unchecked to ensure that the animation will only exit into a transition when we want it to.
Also under Settings, set Transition Duration to 0. This will ensure that the animation will instantly transition to another when we specify, even if it is still in the middle of its own animation.
We also want to do this for the transitions from each animation to the Exit state so that the animation will instantly end when the player stops moving.
If you look at each transition, you will see a warning underneath Conditions that says
Transition needs at least one condition or an Exit Time to be valid, otherwise it will be ignored.
Since we no longer have an exit time to tell the animation when to transition, we need to specify when it should transition based on a condition. There are different ways we can do this, but one way is to tell the animation to change based on the horizontal and vertical velocity.
For example, if the horizontal velocity is greater than 0, we are moving in the positive x direction so we should transition to the right animation. The same logic works for the other directions.
First we need to create variables on the animator which will hold the horizontal and vertical velocities. In the Animator Window you will see two tabs named Layers and Parameters. Click on the Parameters tab to open it. Here you can add variables called Parameters which you can use in transition conditions.
Click on the + sign in the top right and select Float to create a new float parameter. Name it Horizontal. Then create another float parameter and name it Vertical.
Now we can use these parameters to create conditions for each transition. Let's start with the Any State to Forward transition.
Click on the transition, then in the Inspector Window, click on the + button where it says the Conditions. This will create a new condition.
In the first drop down box you can select the parameter to check in the condition. Since this is for the forward animation, which is really moving down vertically, we will set the parameter to be Vertical.
Since this is a float parameter, the next drop down box will be the conditional operator (either Greater than or Less than). Remember that the forward animation should happen when the player is moving down vertically i.e. the vertical velocity will be negative. Therefore you need to use the Less operator.
The final box is the value we want to compare the parameter to. In this case, we want to check that the vertical velocity is less than 0, so you can type 0 into the last box.
Now we just have to add the conditions for the other transitions.
The Any State to Back transition should happen when Vertical is greater than 0. The Any State to Left transition should happen when Horizontal is less than 0. The Any State to Right transition should happen when Horizontal is greater than 0.
Finally, we need to set the conditions for the transitions from the animation states to the Exit state.
In theory, we want to transition to the Exit state when the player is not moving, meaning that the horizontal or vertical velocity should be equal to 0. However there is no way to check equality in a float condition so instead we can check if the value is greater than -0.01 or less than 0.01.
For example, for the Forward to Exit transition, the condition would be that the vertical velocity should be greater than -0.01.
Now we just have to add the conditions for the other transitions to the Exit State.
The Back to Exit transition should happen when Vertical is less than 0.01. The Left to Exit transition should happen when Horizontal is greater than -0.01. The Right to Exit transition should happen when Horizontal is less than 0.01.
Now all the animations are set up and the transitions have the correct conditions. The last thing to do is hook up the actual player velocity to the Horizontal and Vertical parameters in the Animator. This can be done via scripting.
Open the Player Controller script again. First create an Animator variable named animator which will be used to reference the Animator component on the Player object.
public class PlayerController : MonoBehaviour
{
    [SerializeField] float speed = 7f;

    Rigidbody2D rb;
    Animator animator;
Now in the Start() method we can get the reference to the Animator component.
public class PlayerController : MonoBehaviour
{
    [SerializeField] float speed = 7f;

    Rigidbody2D rb;
    Animator animator;

    void Start()
    {
        rb = GetComponent<Rigidbody2D>();
        animator = GetComponent<Animator>();
    }
Now in the Update() method we can use the animator's SetFloat() method to set the Horizontal parameter to the rigidbody's x velocity and set the Vertical parameter to the rigibody's y velocity.
        void Update()
    {
        Vector2 v = new Vector2(Input.GetAxis("Horizontal"), Input.GetAxis("Vertical"));
        v.Normalize();
        v *= speed;
        rb.velocity = v;
        animator.SetFloat("Horizontal", rb.velocity.x);
        animator.SetFloat("Vertical", rb.velocity.y);
    }
Now save the script and go back into the Unity Editor.
The animations will now transition and play based on the velocity of the player. However, because any state can transition to any other state, this includes states transitioning to themselves.
This would result in a loop of a state constantly transitioning to itself when a condition is met so the animation won't play. To fix this we can uncheck the Can Transition To Self field in the settings for each transition coming from Any State.
Play the game and you should see that the player now has animated movement.