Create an RPG Quest System
In this tutorial, you will learn how to add a detachable quest system to the RPG game.
Prerequisites: RPG Core System
Open the RPG project you have been working on, or download the template here: RPG Template
The Quest System Architecture
How do you design an RPG Quest system?
Since you already have the basics of an RPG combat system, and a level-up system, it's time to start adding more complex RPG systems. The system you will add in this lesson is a Quest system. This system will need to take action based on what the player does, and the UI will need to display information about the player's quests.
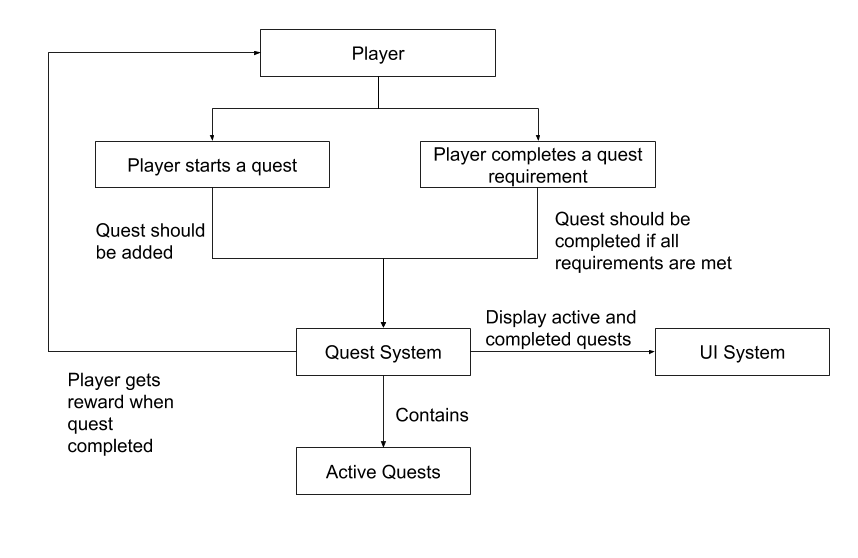
For every system that you intend to add, it's a good idea to put together a diagram before you start programming the system. That way, you can understand how that system will relate to the other systems you've already made
Example Quests and Rewards
When designing an RPG game, you need to spend a little more time coming up with your design than with other game types. Think about the design of the game for a minute. What quests would be meaningful for the player to complete?
Think about what you want the player to do, and how you want to direct them through the world. Here's some example quests that you could have in your game:
1. Have the player reach a location
2. Have the player defeat an enemy
3. Have the player defeat a certain number of enemies
4. Have the player pick up an object
Creating Event Architectures
Now that you have an idea of the potential quests for the player, take the
Reach a locationquest as an example. You will need a
locationobject inside of the world. When the player enters this location, they should complete the quest. From past experience, you might guess that this will be a basic game object with a trigger box collider placed in the world and a script that performs an action when the player enters the trigger.
The goal for the quest system architecture is for the system to be modular. That means if the entire quest system is turned off, the game will still play normally with all the functionality it already has. Unfortunately, if our location script directly calls our quest system, if the quest system is turned off the game will crash.
None of your systems should be directly telling other systems what they should be doing. When one system has important information that other systems might need to know about, they should be raising an event. If there are other systems that need to do something because the event occurred, they should be listening to the event, not listening to the in-world object.

In this diagram, you can see that the Quest System is now isolated from the other systems through events. Instead of the Player system directly calling the quest system or the quest system directly calling the UI system, all these systems communicate through events to know the state of the game world has changed.
Creating Event System Scriptable Objects
To create our event system, you're going to use Scriptable Objects. Each different game event will be represented by a Scriptable Object. Create a GameEvent.cs script using the below code.
Note: This code won't compile yet, because there are two parts to an event system. Firstly, the events that are called, secondly the event listener, which causes systems to take action when an event is called. Make sure to set up both scripts and then go back to the editor and make sure the scripts compile.
using System.Collections;
using System.Collections.Generic;
using UnityEngine;

[CreateAssetMenu]
public class GameEvent : ScriptableObject
{
    protected List<GameEventListener> eventListeners = new List<GameEventListener>();


    public virtual void Raise()
    {
        for(int i = eventListeners.Count -1; i >= 0; i --)
        {
            eventListeners[i].OnEventRaised();
        }
    }

    public void RegisterListener(GameEventListener listener)
    {
        if (!eventListeners.Contains(listener))
        {
            eventListeners.Add(listener);
        }
    }

    public void UnregisterListener(GameEventListener listener)
    {
        if (eventListeners.Contains(listener))
        {
            eventListeners.Remove(listener);
        }
    }
}
An event system is comprised of 4 different parts.
1. A list of event listeners: Whenever an event is called, the event needs to tell every object that is listening for the event that the event has happened.
2. The Raise method: This method iterates through the listeners and make sure they are aware the event has been triggered.
3. The RegisterListener method: This method adds a listener to the list of listeners in the event. When a new object is added to the scene, it must be set up to listen for the event with this method.
4. The UnregisterListener method: When a listener object is removed from the scene, or otherwise destroyed, it needs to be removed.
Create a script called GameEventListener.cs using the below code.
using System.Collections;
using System.Collections.Generic;
using UnityEngine;
using UnityEngine.Events;

public class GameEventListener : MonoBehaviour
{
    public GameEvent Event;
    public UnityEvent Response;

    private void OnEnable()
    {
        Event.RegisterListener(this);
    }

    private void OnDisable()
    {
        Event.UnregisterListener(this);
    }

    public void OnEventRaised()
    {
        Response.Invoke();
    }

}
For each of our objects that needs to react to an event, it will include this script. The Event variable will store the event the object should listen for, and the Response will be the script method that will run when the event occurs.
You can include as many things as you want in the response, and you're not limited to only calling code from your custom scripts. For example, after a player defeats an enemy and triggers a Defeated Enemy event, you can set an inactive object to active, such as a house for the player to enter.
Creating Location Reached and Enemy Defeated Events
To illustrate how the event system works. You're going to create some events.
To start, create a new folder in the project called Events. Using the context menu, add an event Scriptable Object with the name ReachedFieldLocation.
Then, create a new script called Location.cs, and add the below code.
using System.Collections;
using System.Collections.Generic;
using UnityEngine;
using UnityEngine.Events;

public class Location : MonoBehaviour
{

    public GameEvent locationReachedEvent;

    private void OnTriggerEnter(Collider other)
    {
        if (other.gameObject.tag == "Player")
        {
            locationReachedEvent.Raise();
        }
    }
}
The code here can use any event that we place in the locationReachedEvent variable. When the trigger is entered, and the object is the player object as indicated by the tag, then the event is raised. This will cause the event to trigger all listeners that are paying attention to it.
Create a game object, add a box collider as a trigger, and add the Location script to the object. Then, set the public variable to the ReachedFieldLocation game event that was set up earlier.
So you have an event, and the event is raised every time the player enters the location, but right now nothing happens because of that event. There are no scripts that are listening for that event yet.
To illustrate how to set up an event listener, you're going to have the UI display a notification every time the player enters the location. In the Prefabs folder, find the NotificationPanel Prefab and add that as a child of the UICanvas.
Then, add the below code to the UI Manager script.
using System.Collections;
using System.Collections.Generic;
using UnityEngine;
using UnityEngine.UI;

public class UIManager : MonoBehaviour
{
    public Text attackText;
    public Image healthBar;

    public FloatVariable playerHealth;
    public FloatVariable playerMaxHealth;
    public FloatVariable playerAttack;

    public Image expBar;
    public FloatVariable playerEXP;
    public FloatVariable playerEXPToNextLevel;

    public Animation notificationPanelAnimation;
    public Text notificationText;

    private void Update()
    {
        attackText.text = playerAttack.Value.ToString();
        float healthPercent = playerHealth.Value / playerMaxHealth.Value;
        healthBar.transform.localScale = new Vector3(healthPercent, 1f);
        float expPercent = playerEXP.Value / playerEXPToNextLevel.Value;
        expBar.transform.localScale = new Vector3(expPercent, 1f);

    }

    public void displayLocationReached()
    {
        string notificationMessage = "You have reached a location";
        Debug.Log(notificationText);
        notificationText.text = notificationMessage;
        notificationPanelAnimation.Play();
    }

}
The two new variables are the animation that is on the NotificationPanel object, and the Text component for the notification Panel. We're going to change the text in the notification panel to indicate that the player reached a location, and trigger an event that displays the notification and gradually fades it out.
The displayLocationReached method will set up a notification message for the player, and play the animation.
Drag the NotificationPanel game object into the notificationPanelAnimation field, and the NotificationText game object into the notificationText field.
There's one last thing to do: adding the event listener. Add the component GameEventListener to the object, and drag the ReachedFieldLocation Game event into the field. Then, add the UICanvas as the object to call the script, select the UIManager script, and select the displayLocationReached method.
Now, whenever the ReachedFieldLocation Game Event is raised, the displayLocationReached method will be called. Play the game and walk into the location to see the notification appear in your view.
To get a little more practice, you can set up another event for when a monster is defeated. But for this one, you can do it a little differently.
First, create an event using the context menu called DefeatedBlueMonster. This event will be called any time the player defeats a blue monster.
Then, create a new script called MonsterType.cs using the below code. This script will allow us to classify monsters. By using a scriptable object, we can give a bunch of monsters the same properties, without having to go update all the monsters on the field when we want to update those properties.
using UnityEngine;
using System.Collections;

[CreateAssetMenu]
public class MonsterType : ScriptableObject
{
    public GameEvent monsterDefeatedEvent;
}
Create a BlueMonster monster type using the context menu in a new folder called MonsterTypes. Then, add your newly created event into the monsterDefeatedEvent field.
Now, go to the MonsterBehavior script and add a new variable for MonsterType.
using System.Collections;
using System.Collections.Generic;
using UnityEngine;
using UnityEngine.SceneManagement;

public class MonsterBehavior : MonoBehaviour
{

    public float moveSpeed = 2f;
    public float turnSpeed = 40f;

    private GameObject player;
    private bool playerSpotted;

    private float speed;

    public FloatVariable monsterMaxHealth;
    public float monsterCurrentHealth;
    public FloatVariable monsterAttack;

    public FloatVariable playerHealth;
    public FloatVariable playerAttack;
    public FloatVariable monsterEXP;
    public FloatVariable playerEXP;

    public MonsterType monsterType;

    void Start()
    {
        player = GameObject.FindGameObjectWithTag("Player");
        monsterCurrentHealth = monsterMaxHealth.Value;
    }
In the OnCollisionEnter method, raise the MonsterDefeatedEvent whenever the monster is defeated by the player.
	void OnCollisionEnter(Collision other)
    {
        if (other.gameObject == player)
        {
            playerHealth.Value -= monsterAttack.Value;
        }
        else if (other.gameObject.tag == "Blade")
        {
            monsterCurrentHealth -= playerAttack.Value;
            if (monsterCurrentHealth <= 0)
            {
                playerEXP.Value += monsterEXP.Value;
                monsterType.monsterDefeatedEvent.Raise();
                Destroy(this.gameObject);
            }
        }
    }
Go to the UIManager script and add a new method for the message that should display when an enemy is defeated. It looks mostly the same as the displayLocationReached method, but with the notification text changed.
    public void displayLocationReached()
    {
        string notificationMessage = "You have reached a location";
        Debug.Log(notificationText);
        notificationText.text = notificationMessage;
        notificationPanelAnimation.Play();
    }

	public void displayEnemyDefeated()
    {
        string notificationMessage = "You have defeated an enemy";
        Debug.Log(notificationText);
        notificationText.text = notificationMessage;
        notificationPanelAnimation.Play();
    }
Add another event listener to the UICanvas's UIMananger component, and set it up to listen for the DefeatedBlueMonster event. Add the monster type to the blue monster on the field and defeat it.
Creating Parameterized Events and Listeners
You now have an event system, and two events, one for when the player reaches the field and another for when the player defeats a blue enemy.
Using events this way is great! Why? Turn off the UIManager object and play the game. The game will play as normal, and when you go to the locations and defeat the enemy and see that the game continues playing.
If you had set up the enemy to directly call the UI whenever they were defeated, the game would have crashed because the UI was disabled. Now, the event is called, and because there is nothing listening for the event, nothing happens.
This is a very important principle for performing testing of your game. If there's a part of your game that you're not working on that's broken and preventing you from working on a different system, you can just turn the broken system off until you're ready to work on it again.
As exciting as this is, you might have noticed a problem that's going to cause you a lot of work. If you want to call different events based on different locations and different enemies, you're going to need to set up a new event AND a new listener for EACH one of the events. That's going to get old in a a hurry, especially when you have a large RPG with dozens of locations and enemy types.
To make things easier to manage, we're going to create game events that can be parameterized. Every time the event is called, we can pass in a string. In the case of the location event, we can pass in a string to the event for the location name, and for the enemy script we can pass in a string for the monster name.
Then, the listeners for those events can do different things based on the string input. For example, we can have the notification display the name of the location or enemy. When you start making quests, using parameterized events is going to be very important.
Create a new script called GameEventString.cs, and make it a sub class of GameEvent. When this event is raised, it will pass a string parameter to all of its listeners.
using System.Collections;
using System.Collections.Generic;
using UnityEngine;

[CreateAssetMenu]
public class GameEventString : GameEvent
{

    public virtual void Raise(string stringParameter)
    {
        for (int i = eventListeners.Count - 1; i >= 0; i--)
        {
            eventListeners[i].OnEventRaised(stringParameter);
        }
    }
}
Now, the GameEventListener code needs to be updated to be able to handle an event based on a string. To set this up, there needs to be a method for invoking a response based on a string parameter input for an event.
using System.Collections;
using System.Collections.Generic;
using UnityEngine;
using UnityEngine.Events;

public class GameEventListener : MonoBehaviour
{
    public GameEvent Event;
    public UnityEvent Response;
    public StringEvent stringResponse;

    private void OnEnable()
    {
        Event.RegisterListener(this);
    }

    private void OnDisable()
    {
        Event.UnregisterListener(this);
    }

    public void OnEventRaised()
    {
        Response.Invoke();
    }

    public void OnEventRaised(string stringParameter)
    {
        stringResponse.Invoke(stringParameter);
    }

}

[System.Serializable]
public class StringEvent : UnityEvent<string> { }
Next, update the Location script to use a GameEventString, and raise the event with the Location's name as the parameter.
using System.Collections;
using System.Collections.Generic;
using UnityEngine;
using UnityEngine.Events;

public class Location : MonoBehaviour
{

    public GameEventString locationReachedEvent;

    private void OnTriggerEnter(Collider other)
    {
        if (other.gameObject.tag == "Player")
        {
            locationReachedEvent.Raise(this.gameObject.name);
        }
    }
}
Before you return to the UIManager, add a name to the MonsterType, and specify the monster type in the field
using UnityEngine;
using System.Collections;

[CreateAssetMenu]
public class MonsterType : ScriptableObject
{
    public string monsterName;
    public GameEventString monsterDefeatedEvent;
}
In MonsterBehavior, change the Raise call in the OnCollisionEnter method to use the monster's new name.
void OnCollisionEnter(Collision other)
    {
        if (other.gameObject == player)
        {
            playerHealth.Value -= monsterAttack.Value;
        }
        else if (other.gameObject.tag == "Blade")
        {
            monsterCurrentHealth -= playerAttack.Value;
            if (monsterCurrentHealth >= 0)
            {
                playerEXP.Value += monsterEXP.Value;
                monsterType.monsterDefeatedEvent.Raise(monsterType.monsterName);
                Destroy(this.gameObject);
            }
        }
    }
To finish the setup, set up the remaining links with the new events.
1. Make sure you've made the new events with the string parameter. Call the location event LocationReached, and the other event MonsterDefeated
2. Change the location object to use the new string parameter event
3. Add the name to the monster type.
4. Change the event the monster raises to the new string parameter event.
Lastly, update the UIManager code to use string parameters.
    public void displayLocationReached(string stringParameter)
    {
        string notificationMessage = "You have reached the location: " + stringParameter;
        Debug.Log(notificationText);
        notificationText.text = notificationMessage;
        notificationPanelAnimation.Play();
    }

    public void displayEnemyDefeated(string stringParameter)
    {
        string notificationMessage = "You defeated an enemy: " + stringParameter;
        Debug.Log(notificationText);
        notificationText.text = notificationMessage;
        notificationPanelAnimation.Play();
    }
Set up the event listeners for the UIManager by changing the events listened to and the response category used.
When you select the response, you'll notice that there are two types of responses, one which is
dynamicand one which is
static. Make sure that you select dynamic, because that will pass the string parameter from the event to the response code.
When you play the game now, you'll see the name of the location or type of enemy you defeated.
Creating Quest Objects
Now that you have familiarity with events, it's time to set up the quest system. Our quest system will be listening for the location and enemy defeated events and reacting based on their completion.
This is a great programming structure, because you were able to create code related to the player interacting with the real world without ever touching the event system. And now, because that code is set up, it will not have to be edited as you're making the Quest system.
This is an example of modular code. You can complete all the code for one system without ever touching the other systems that are going to interact with that code.
Create a script for the Quest. The Quest Scriptable Object is the most complicated Scriptable Object you've made so far. Not only does it have a large number of parameters, but it also has methods that can be executed.
using System.Collections;
using System.Collections.Generic;
using UnityEngine;

[CreateAssetMenu]
public class Quest : ScriptableObject
{

    public string questName;
    public string questDescription;
    public string questRequirementString;
    public int questRequirementTimes = 1;
    private int questRequirementCurrent = 0;
    public float questEXPReward;
    public bool questCompleted;
    public GameEventQuest questCompletedEvent;


    public void checkQuest(string stringParameter)
    {
        if (!questCompleted)
        {
            if (stringParameter == questRequirementString)
            {
                questRequirementCurrent++;
            }

            if (questRequirementCurrent >= questRequirementTimes)
            {
                questCompleted = true;
                questCompletedEvent.Raise(this);
            }
        }

    }

    public void resetQuest()
    {
        questCompleted = false;
        questRequirementCurrent = 0;
    }

}
Just like you created a string parameter event, create the script GameEventQuest which uses quests as a parameter, and add the ability for the GameEventListener to listen for quest events.
using System.Collections;
using System.Collections.Generic;
using UnityEngine;

[CreateAssetMenu]
public class GameEventQuest : GameEvent
{
    public virtual void Raise(Quest questParameter)
    {
        for (int i = eventListeners.Count - 1; i >= 0; i--)
        {
            eventListeners[i].OnEventRaised(questParameter);
        }
    }
}
Lastly, update the GameEventListener class to also listen for the event from the GameEventQuest.
using System.Collections;
using System.Collections.Generic;
using UnityEngine;
using UnityEngine.Events;

public class GameEventListener : MonoBehaviour
{
    public GameEvent Event;
    public UnityEvent Response;
    public stringEvent stringResponse;
    public questEvent questResponse;

    private void OnEnable()
    {
        Event.RegisterListener(this);
    }

    private void OnDisable()
    {
        Event.UnregisterListener(this);
    }

    public void OnEventRaised()
    {
        Response.Invoke();
    }

    public void OnEventRaised(string stringParameter)
    {
        stringResponse.Invoke(stringParameter);
    }

    public void OnEventRaised(Quest questParameter)
    {
        questResponse.Invoke(questParameter);
    }

}

[System.Serializable]
public class stringEvent : UnityEvent<string> { }

[System.Serializable]
public class questEvent : UnityEvent<Quest> {}
Create 2 quest events, one for when a quest is added, and one for when a quest is completed.
Then, create a folder inside of the Variables folder called Quests. Create one quest for a location reached quest, and another for an enemy defeated.
The Quest object still needs a way to listen for events that occur in the actual scene. In order to do that, you're going to place a Quest Manager in the scene.
Creating a Quest Manager
To listen for the events that are triggered by the player's actions, create an object on the scene called QuestManager. Then, create a script called QuestManager.cs, use the below code, and add it to the object.
using System.Collections;
using System.Collections.Generic;
using UnityEngine;

[CreateAssetMenu]
public class QuestManager : MonoBehaviour
{
    public List<Quest> questList;
    public GameEventQuest addedQuestEvent;

    private void Start()
    {
        if (questList == null)
        {
            questList = new List<Quest>();
        }
        foreach (Quest quest in questList)
        {
            quest.resetQuest();
            addedQuestEvent.Raise(quest);
        }
    }

    public void questEventActivated(string stringParameter)
    {
        foreach(Quest quest in questList)
        {
            quest.checkQuest(stringParameter);
        }
    }

    public void addedQuest(Quest questParameter)
    {
        if (!questList.Contains(questParameter))
        {
            questList.Add(questParameter);
        }
    }

}
This script will raise the AddedQuest event at the start of the game, which will reset the quests if they have been completed by the player earlier. If you are creating an RPG with multiple scenes, you would only want to reset the progress of the quests when the player starts a new game.
Setting up this object in the scene happens in three parts:
1. Add the QuestManager object to the scene and attach the script
2. Add the quests to the object's quest list
3. Add the questAdded event (so that any scripts that need to perform actions when quests are added can be triggered)
4. Add event listeners for the LocationReached and MonsterDefeated events.
Right now, we're going to set up the events at the beginning of the game. Add the Quest Scriptable Objects that you have created to the QuestManager's list in the scene.
Make sure that the responses both use a dynamic script call to the questEventActivated method. This method will apply the event to each of the quests in the current list, checking to see if they should be completed based on the event that was raised.
Play the game, and watch the Quest Scriptable Objects to see them completed when you perform the necessary actions.
Add Quest-related UI
There still needs to be a way for the player to see the status of their quests. Look in the Prefabs folder and select the QuestPanel prefab. Add a script titled QuestPanel.cs to the QuestPanel prefab using the following code.
using System.Collections;
using System.Collections.Generic;
using UnityEngine;
using UnityEngine.UI;

public class QuestPanel : MonoBehaviour
{
    public Text questDescriptionText;
    public Toggle questToggle;
    Quest quest;

    public void Update()
    {
        questToggle.isOn = quest.questCompleted;
    }


    public void setupQuest(Quest quest)
    {
        this.quest = quest;
        questDescriptionText.text = quest.questDescription;
    }
}
After attaching the script to QuestPanel, open up the prefab and link the text and toggle with the variables of the script.
Then, update the UIManager script with additional variables and a new method that will take the QuestPanel prefab and add it to the QuestList.
using System.Collections;
using System.Collections.Generic;
using UnityEngine;
using UnityEngine.UI;

public class UIManager : MonoBehaviour
{
    public Text attackText;
    public Image healthBar;

    public FloatVariable playerHealth;
    public FloatVariable playerMaxHealth;
    public FloatVariable playerAttack;

    public Image expBar;
    public FloatVariable playerEXP;
    public FloatVariable playerEXPToNextLevel;

    public Animation notificationPanelAnimation;
    public Text notificationText;

    public Transform questPanelParent;
    public GameObject questPanelPrefab;

    private void Update()
    {
        attackText.text = playerAttack.Value.ToString();
        float healthPercent = playerHealth.Value / playerMaxHealth.Value;
        healthBar.transform.localScale = new Vector3(healthPercent, 1f);
        float expPercent = playerEXP.Value / playerEXPToNextLevel.Value;
        expBar.transform.localScale = new Vector3(expPercent, 1f);
    }

    public void displayLocationReached(string stringParameter)
    {
        string notificationMessage = "You have reached the location: " + stringParameter;
        Debug.Log(notificationText);
        notificationText.text = notificationMessage;
        notificationPanelAnimation.Play();
    }

    public void displayEnemyDefeated(string stringParameter)
    {
        string notificationMessage = "You defeated an enemy: " + stringParameter;
        Debug.Log(notificationText);
        notificationText.text = notificationMessage;
        notificationPanelAnimation.Play();
    }

    public void addedQuest(Quest questParameter)
    {
        GameObject createdQuestPanel = Instantiate(questPanelPrefab, questPanelParent);
        createdQuestPanel.GetComponent<QuestPanel>().setupQuest(questParameter);
    }
}
To set up the UI Canvas, add the QuestList prefab to the UI Canvas, and the transform to the questPanelParent variable, and add the prefab to the UIManager.
Then, add a listener for the Quest Added event to call the addedQuest method. Every time a quest is added, the UI will now add a new panel for that quest telling the player what they need to do.
It would be nice if the player could turn off the quest list when it's in their way and they don't want to see it. Rather than managing a list of all the active quests and iterating through them when we intend to update them, you can have the UIManager communicate with the QuestPanels with events.
Create two events using the GameEvent Scriptable Object, called HideQuestUI and DisplayQuestUI. Then add the below code to the Update method of the UIManager script. This code handles adding the Game Events, pressing the Q key when the player wants to toggle the quest list, and hiding the quest panel after creation if the user doesn't have the quest panels active.
	public Transform questPanelParent;
    public GameObject questPanelPrefab;

    private bool questsDisplayed = true;
	public GameEvent hideQuestUI;
    public GameEvent displayQuestUI;

	private void Update()
    {
        attackText.text = playerAttack.Value.ToString();
        float healthPercent = playerHealth.Value / playerMaxHealth.Value;
        healthBar.transform.localScale = new Vector3(healthPercent, 1f);
        float expPercent = playerEXP.Value / playerEXPToNextLevel.Value;
        expBar.transform.localScale = new Vector3(expPercent, 1f);

        if (Input.GetKeyDown(KeyCode.Q))
        {
            if (questsDisplayed)
            {
                hideQuestUI.Raise();
                questsDisplayed = false;
            } else
            {
                displayQuestUI.Raise();
                questsDisplayed = true;
            }
        }

    }
Then, update the addedQuest method of the UIManager to hide the quest
	public void displayEnemyDefeated(string stringParameter)
    {
        string notificationMessage = "You defeated an enemy: " + stringParameter;
        Debug.Log(notificationText);
        notificationText.text = notificationMessage;
        notificationPanelAnimation.Play();
    }

    public void addedQuest(Quest questParameter)
    {
        GameObject createdQuestPanel = Instantiate(questPanelPrefab, questPanelParent);
        createdQuestPanel.GetComponent<QuestPanel>().setupQuest(questParameter);
        if (!questsDisplayed)
        {
            createdQuestPanel.GetComponent<QuestPanel>().hideQuestPanel();
        }
    }
Lastly, update the QuestPanel script to show and hide the panels.
    public void setupQuest(Quest quest)
    {
        this.quest = quest;
        questDescriptionText.text = quest.questDescription;
    }

    public void hideQuestPanel()
    {
        this.gameObject.GetComponent<Image>().enabled = false;
        questDescriptionText.enabled = false;
        questToggle.targetGraphic.enabled = false;
        questToggle.graphic.color = new Color(1f, 1f, 1f, 0f);
    }

    public void displayQuestPanel()
    {
        this.gameObject.GetComponent<Image>().enabled = true;
        questDescriptionText.enabled = true;
        questToggle.targetGraphic.enabled = true;
        questToggle.graphic.color = new Color(0f, 0f, 0f, 1f);
        questToggle.targetGraphic.color = questToggle.colors.disabledColor;
    }
In the QuestPanel Prefab, set up listeners for the two events to point to the relevant methods in the QuestPanel script. Then, play the game and toggle the quest panels on and off with the Q key.
Creating a Quest chain
Rather than giving the player all the quests at the beginning of the level, it can be helpful to guide the player by giving them one quest at a time.
Return to the Quest script and add the GameEventQuest variable and a Quest variable. Then, update when the quest is completed to raise the questAddedEvent if there is a new quest to add.
using System.Collections;
using System.Collections.Generic;
using UnityEngine;

[CreateAssetMenu]
public class Quest : ScriptableObject
{

    public string questName;
    public string questDescription;
    public string questRequirementString;
    public int questRequirementTimes = 1;
    private int questRequirementCurrent = 0;
    public float questEXPReward;
    public bool questCompleted;
    public GameEventQuest questCompletedEvent;
    public GameEventQuest questAddedEvent;
    public Quest questToAdd;

    public void checkQuest(string stringParameter)
    {
        if (!questCompleted)
        {
            if (stringParameter == questRequirementString)
            {
                questRequirementCurrent++;
            }

            if (questRequirementCurrent >= questRequirementTimes)
            {
                questCompleted = true;
                questCompletedEvent.Raise(this);
                if (questToAdd != null)
                {
                    questAddedEvent.Raise(questToAdd);
                }
            }
        }

    }

    public void resetQuest()
    {
        questCompleted = false;
        questRequirementCurrent = 0;
    }

}
In the QuestManager, remove the EnemyDefeated quest from the quest list and add it to the Quest variable of the LocationReached quest. If the player reaches that location and finishes the first quest, now they'll get the second quest in their list.
There's one last change you need to make to ensure that you can complete the new quest that has been added. Since the QuestAdded event was called, the UI updated based on the event...but the QuestManager also needs to listen for that event so that it will be updated when the player completes the second quest.
The system is now linked. You can write scripts anywhere in your world that raise the QuestAdded event. It doesn't matter if you have the UI system, or even the QuestManager system inside of the scene. This means you could set up a bare-bones testing scene that will still work, if you want to test something small without having all the other systems inside your game.
Future Systems
Potential systems for the future.
There are plenty more systems you could add, such as an inventory systems, an equipment system, a shop system, a crafting system, and countless others. Modern RPG games often have many different parts of the world the player interacts with.
As you consider creating these systems, make sure that you plan out the design of these systems (write out what meaningful events will be necessary to communicate between systems) before writing the code. And when you are planning out these systems, make sure that if you completely disable one system, all the other systems will still work.
Why is it important you can disable other systems? Imagine you are working on a game with other people, and you are working on one system while someone else is working on another. You need to be able to turn off your teammate's system until he finishes coding it to be able to test your own system.
By using Scriptable Objects and Events, you can ensure that different parts of the system don't interfere with one another, and you can create a game that is both easy to maintain, and easy to add additional systems to with a team of programmers.