FPS Mod
In this tutorial, you will learn how to create a First Person Shooter game.
Features of a FPS
Some games involve destroying enemies to get to the next goal. In this one we will have the player shoot a gun at oncoming enemies.
Most if not all FPS games have enemies you have to defeat to make it to the next round or level. Each wave will increase in difficulty as more enemies appear each wave. After defeating all enemies in a wave the next wave will start, until all waves are finished.
This is a template project that will get you started, download it here: _FPSTemplate.zip
You can play the game by using the w, a, s, and d keys to move, and the mouse to look around the screen. You can press the left mouse button to fire your gun, but there's no enemies to shoot at the moment.
Making Enemy Pathing AI
We already have an Enemy script and Prefab that looks for the player and deals damage to them on contact. However the enemy still does not know how to move, or track the player in any way. This means we need to add a NavMesh to the scene.
Building a NavMesh means to build a large plane on the terrain, that molds to the shape of the terrain. This then can be used to create pathing AI for enemies and other NPCs.
In the project there is already a folder for all the NavMesh scripts. Create an empty game object and name it
NavMesh. Then add the script NavMeshSurface to the object you just made. Then press Bake to create the NavMesh in the scene.
Now the enemies can find and try to attack the player, and go around obstacles. However if you look closely in the scene the enemies try to avoid the area the player spawns and the boxes. We don't want them to avoid those places, so we need to tell the NavMesh to not avoid certain layers. To do this we need to go to the Include Layers dropdown menu, and uncheck the layers Player and Boxes. Then re-bake the NavMesh on the scene.
Creating Waves of Enemies
At the top of the Hierarchy you will see a game object called Game Manager. In its Inspector there is the Wave Spawn script.
First, go into the Prefabs folder and find the Enemy prefab. Drag that prefab into the Enemy field you see in the Wave Spawn script.
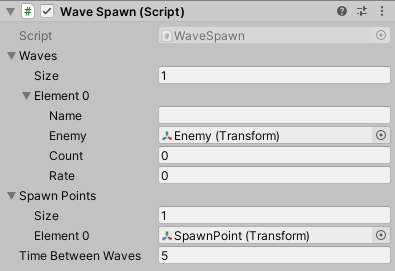
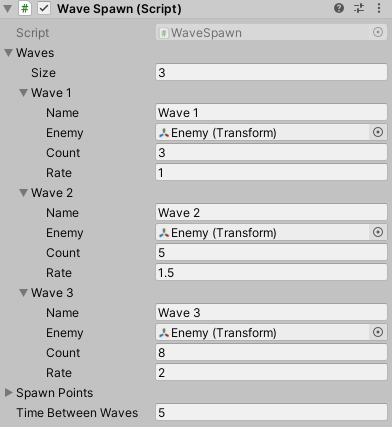
First, let's look at creating multiple waves, each with a different amount of enemies. Under the Waves tab in the script it says Size. This is the current numbers of waves the player will face. Change the size to be 3 or more, so we can have multiple waves.

Feel free to name each wave whatever you want, this way we can keep track if any issues pop-up.
We have our waves, but we have yet to tell how many enemies should spawn and at what rate. The variable Count is the amount of enemies that will spawn. Change the count so that each wave has more and more enemies.
The variable Rate is the rate of which enemies will spawn. The higher the numbers is, the faster enemies will spawn. You can make the rate the same for all of them, or increase it for each wave. Test what you like by playing the game and seeing if the number you put was satisfactory.
In the Wave Script you will notice there is a part that asks for an Enemy.
This is asking for a type of enemy to spawn into the level. There is currently only one type of enemy, but if you want you can create new enemies and then drag their prefab into this part of the script. That way every wave could have a different type of enemy to fight.
This is asking for a type of enemy to spawn into the level. There is currently only one type of enemy, but if you want you can create new enemies and then drag their prefab into this part of the script. That way every wave could have a different type of enemy to fight.
Creating More Spawn Points
While testing out the waves, you will notice that all the enemies are only spawning at one point in the map. This is because we have told the Wave Script that there is only one point to spawn from.
In the script, under the section Spawn Points, there is an another list. In it you can see that we are currently saying the list only has one object in it.
Let's add more Spawn Points for the enemies to come from. To do this all we need to do is create an empty game object and name it
Spawn Point 2. Then place it in the scene where we want enemies to spawn.
You can create as many spawn points as you want this way. After you have created your spawn points, return to the location of the Wave Spawn script with the Spawn Points. Increase the Size variable to the number of spawn points you created, and drag your spawn points from the hierarchy to the newly created fields.
When you play the game now, enemies will spawn randomly from one of the spawn points.
Now the enemies will randomly spawn at each new spawn point you added to the list.
Adding a Health Bar
Lastly, we will add a health bar to the player so you know when you are low on health.
First, we need to create the UI of the Health Bar on our screen. Go to the Canvas and Right-Click > UI > Panel. Move the panel to where you want the health bar to be, make sure it is not obstructing the vision for the rest of the game. name it
HealthBar. Then go under the panel we just created and Right-Click > UI > Image. This will be the filling for the health bar, so call it
Fill. Size the image to fit in the panel.
Now we need to give the Health Bar the ability to move up and down, like the bar is filling and emptying. First, add a color to the image so it can pop more in the scene. Then go to the Health Bar's Inspector, and add the component Slider. Set the slider to be
Nonein both Transition and Navigation, and uncheck the Interactable box. Then drag the Health Bar's Fill image into the Fill Rect slot. Now the bar has the ability to fill and drain.
Finally, time to add the HealthBar script, this will make the health bar drain whenever the player takes damage. Add the script to the HealthBar object. Then drag the HealthBar object into the Slider variable of the script. Finally, go to the FirstPersonController script, in player, and drag the Health Bar object into the Health Bar slot.
Now the basics of a First Person shooter is finished!
If you make changes to the map, remember to re-bake the NavMesh so that enemies can still use it to navigate.
Feel free to add more to your game such as ammo, power-ups, various types of enemies, and more!
What's Next?
Consider an FPS for your final project.
If your team decides to create an FPS for your final project:
The game programmers could:
• Create enemies that fire projectiles at the player
• Create a boss enemy
• Add limited ammo and a reload system.
The artists could:
• Add 3D models and animations for the enemies
• Add textures for the ground and environment to give the world a theme.
• Add a more advanced UI to the game