Version Control
In this tutorial, you will learn how to use Unity Collaborate to sync changes that all your team members make.
Why Use Version Control?
When you are working by yourself, it is easy to save your project. However, once you start working with a team, you need to make sure that everyone can contribute to the project.
If every team member will be contributing to the project, then there are different types of changes they will be contributing to the project.
| Team Role | Project Changes |
|---|---|
| Programmer | Script files |
| Designer | Game levels |
| Artist | 3d models, 2d sprites |
| Producer | Project settings and exported project builds |
Artists can often send their art files to their teammates through a Google Drive, Dropbox, or email. However, Designers and Programmers both need to interact within the same project, as the programmer sets up scripts that designers can put on prefab objects which are then placed on a scene.
Version Control is the way that changes are shared between multiple people working on a project. It enables you to instantly send changes to the Unity Project over to other people who are working on the project. That way, everyone always has the up-to-date project to work on.
Setting Up Unity Collaborate
When following along with this lesson, you can use your own project. If you want to try out the setup steps on a different project and play around before setting up your actual project with Unity Collaborate, you can use the Bouncy Box Project.
Open the project that you want to convert into a Unity Collaborate project, and click the Collab Button, then click Start Now
After the project setup has completed, you need to publish your project so that other team members will be able to see your changes. Click the Collab button again, add a message and click Publish now!
After the changes have been published, you will be able to see the changes in the commit history.
To add team members, click the Collab button, then the Invite Teammate button.
After you click the Invite Teammate button, you may be taken to a website where you will need to accept Unity's terms of service. After you've accepted all the terms of service, you will be taken to the web page to manage your Collab team.
Enter their email associated with their Unity account and click the Add button to add them to your project.
Once a team member is on your project, they will be able to download the project from their Unity Hub.
Publishing Changes
You can now make changes to the project. While Unity Collab will transmit your locally saved changes to your teammates once you publish, you still need to save your changes locally.
Once you save changes locally, you will see the file in the project view have an icon which indicates that locally saved changes have not been published yet.
After you make your changes, go to the Collab Menu, write what you changed, and click Publish Now!.
Once the publish has completed, the icon will disappear from the objects you edited locally.
Once those changes have been published, your teammate can retrieve those changes on their local project.
An icon will display on the Collab button, indicating there are changes that you can bring down to your project.
Click the Collab button and the Update now! buttons and those changes will be imported to your local project.
Resolving Merge Conflicts
When you see that a teammate has made updates and published them, you should immediately update your project to incorporate their changes.
But sometimes two team members will make changes on the same file at the same time. This can often happen when one team member publishes changes on a scene and another team member is working in that same scene.
You will see conflicts when you try to update your project from published changes. By hovering over the conflicted file, pay attention to the two arrows on the right.
Talk with the person who made the changes, and determine whether you want to click Choose mine or Choose theirs. This will throw out either your teammate's changes, or your changes. If you choose to overwrite your teammate's changes, make sure to immediately publish your changes so that your teammate can get your updated files.
Usually, it's best to select Choose theirs. Since they published their changes first, it makes sense that their files get picked in the conflict.
The Launch external tool button allows you to attempt to merge conflicted files, but you should only choose this option if you have experience with using advanced version control tools.
Reverting and Rollbacks
In Unity Collab, the term Revert means deleting locally saved changes. This can be helpful if you made a bunch of changes and saved them locally, but then you realize that you don't want to publish those changes.
In Unity Collab, the term Rollback means rolling back changes to a specific version of the published changes. This can be helpful if your team makes a bunch of changes to the game, but those changes made the game worse so you want to go back to an earlier version.
To revert changes, go into the Collab menu, hover over the file, and click Revert asset.
You can perform a rollback by going to the Collab menu, clicking View History, and then clicking Go back to... on the version you want to go back to.
Rollbacks are a great reason why good messages are important when publishing changes, those messages give you insight into what was changed over time to find the version you want.
If you want to perform a rollback, make sure that everyone on the team knows before the action is performed, and they should update their local project as soon as the rollback is complete.
Good Version Control Practices
To avoid conflicts with your teammates, try to follow these practices.
Don't work on the same scenes
Scenes are a complicated set of references of object properties, so when two people work on the same scene.
Instead of working on the same scene, try to separate your game into different levels, and have a different member of the team work on each level.
In addition, create new scenes for the programmers and the artists that are separate from your actual game. That way, if the programmers want to test out scripts they are writing, or artists want to see how art assets look in the game.
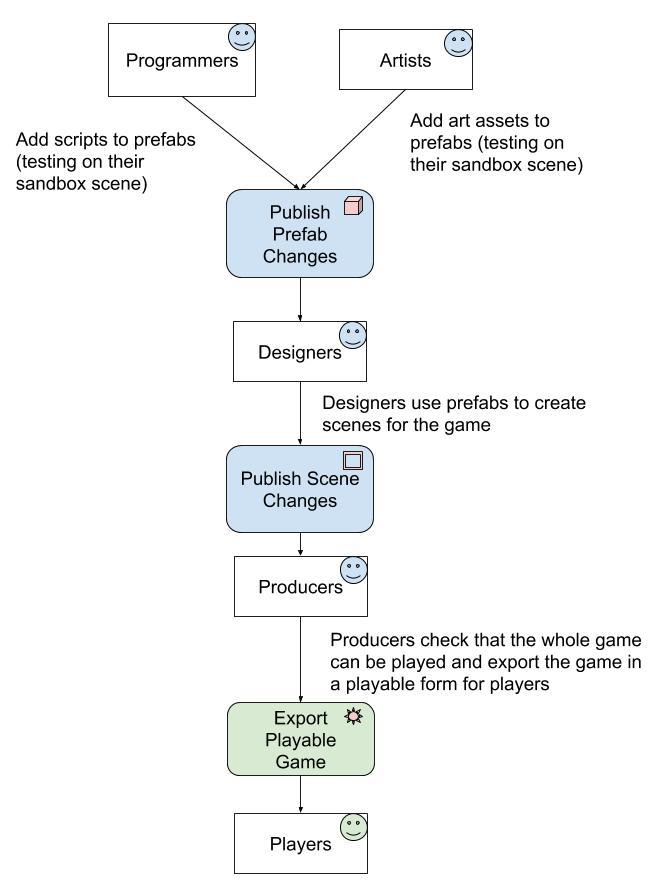
Once the programmers and artists are satisfied with their work, have them create prefabs that the designers can use inside of the levels. That way, designers can drag and drop those prefabs inside of scenes for the player.
After designers create the individual scenes, the producer should check to make sure that the player can go from the title scene and play the game. Once they have tested the game, they will publish it to make it available for players to play.
Below is a picture of how changes can flow from different members of the team.
Use a task board
While your team members should continually be communicating with each other, you should designate regular times where every gets together and writes down what they plan to work on for others to see.
This can be done on a task tool like Trello, or just having team members each write what they're working on. That way, each person can see if they might touch parts of the game other people are working on.
Write good messages
It can be tempting to just write
Changed stuffon your messages. But if you add meaningful messages, it will be easier for teammates to look through and understand what changes were really made.
Not everyone needs access
If you have artists or sound designers who just want to create models or make music, it might make sense for them to keep their files out of the version control system. They will need to work with a designer or programmer with access to incorporate the assets.
If they don't already know how to use Unity well, they might not be able to use version control very well with the rest of the team. By not requiring them to use Collab, they can focus on creating art or sound rather than the more technical aspects of game design.